| Prev | ICM User's Guide 7.7 Alignment Editor | Next |
[ Edit | Save Image | Save Alignment | Print Alignment | Delete Alignment | Annotate Alignment | Box, Shade, Font | Trees | Color | View Options | Gaps | Search | Selections | Consensus | Similarity | Secondary Structure ]
| Available in the following product(s): ICM-Pro |
The default position for the alignment editor is at the bottom of the graphical user interface. If you have made an alignment and you cannot see the alignment you can select Window/Alignments ( See Window Menu section of this manual ) and it will be displayed.
ICM has an easy to use editor for pairwise and multiple alignments. ICM alignment editor is robust and always protects the integrity of your alignment by protecting you from making unintended changes in the alignment.
| NOTE: To increase or decrease the size of the font in the Alignment Editor press the CTRL key and the '+' or '-' keys. |
7.7.1 Edit an Alignment |
To edit an alignment one only needs four types of operations:
- select a block with one or several sequences to be moved (press Ctrl to add blocks). Important: since you can only move the selection to the gapped space , the moving front of the selection must be next to the gaps.
- (optional) create space on both sides around a vertical section of the alignment
- use the keyboard arrows to move the selected block with respect to the other sequences
- squeeze out the excessive gaps (an item in the alignment popup menu)
| OPERATION | KEYS |
|---|---|
| set a vertical selection for ALL sequences in the alignment | Double-Click |
| add white space by hitting the Space bar | SpaceBar |
| remove white space | Backspace |
| select a sub-block for shifting | Drag Left-Mouse-Button |
| shift the selected block next to a gapped area | Right and Left Arrows |
7.7.2 Save Alignment Image |
To save your alignment as an image file:
- Right click on the alignment and select the Save/Export image option.
- Choose the option save as image.
- Enter the filename you wish to call your alignment. We advice you to keep the .png file extensions.
- Select the style you desire from full-width, as is, or 60.
- Select the resolution for the image. We recomend 3.0.
- Select the browse button if you wish to save the picture in a directory other than the one you are running ICM in. If you decide to change directories you will have to reenter the desired file name and click ok. The path of the file will then be entered in the save options data entry box.
- Click OK.
To save your alignment to the clipboard:
- Right click on the alignment and select the Save/Export image option.
- Choose the Save to clipboard option.
7.7.3 Save Alignment |
To save an alignment or tree:
- Right click on the alignment or tree and a menu will be displayed.
- Select the save as option.
- In the windows "Save as Type" dialog box you can choose icb (ICM format), ali or FASTA.
7.7.4 Print Alignment |
To print an alignment or tree:
- Right click on the alignment or tree and a menu will be displayed.
- Select the print option.
7.7.5 Delete Alignmnet |
To delete an alignment or tree:
- Right click on the alignment or tree and a menu will be displayed.
- Select the delete option.
7.7.6 Annotate Alignment |
To annotate an alignment:
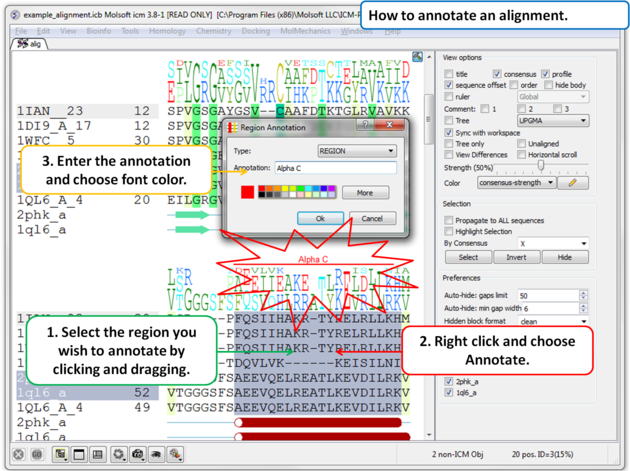 |
|
To Edit an annotation:
- Right click on the annotation and choose Edit}
To Delete an annotation:
- Right click on the annotation and choose Delete}
7.7.7 Box, Shade, Change Font |
To draw a box, shade or change the font around a segment of the alignment:
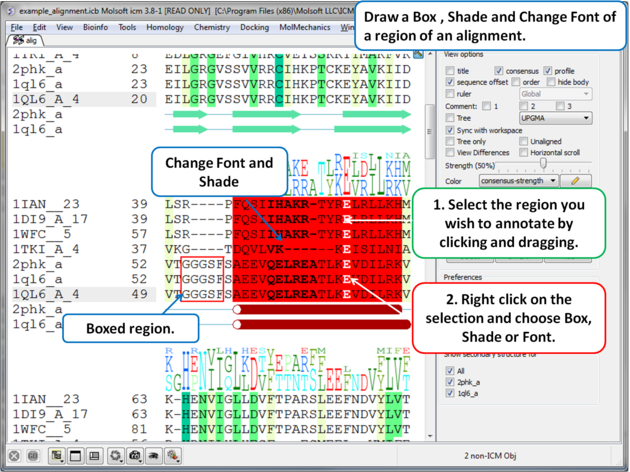 |
|
7.7.7.1 Undisplay box, font or shading |
To undisplay a box, font or shading:
- Click and drag over the boxed or shaded region of the alignment.
- Right click and choose the option "Clear Font/Color/Border".
7.7.8 Phylogenetic Trees |
| NOTE: Before constructing a phylogenetic tree you need to align the sequences as described in the alignment section |
To view a tree:
- Check the 'Tree' option in the alignment editor.
The tree will be displayed in the editor as shown below:
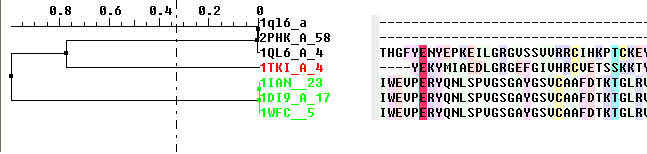
To display the tree alone without the alignment:
- Check the 'tree only' option in the alignment editor.
Tree functionality:
- the tree-section in the alignment is resizeable, just grab the rightmost end of the top ruler and drag it
- branch swapping : the sequences can be reordered by swapping the tree branches. Just do the following:
- Right-click on a tree-node to get a popup-menu
- swap the branches
- selecting a branch: double click on a tree-node to select the sequences belonging to it.
7.7.9 Coloring an Alignment. |
How to color an alignment:
There are a wide range of default coloring schemes.
- Click on the drop down arrow beside the "Color" data entry box and a number of color schemes will be displayed.
- Select the color scheme.
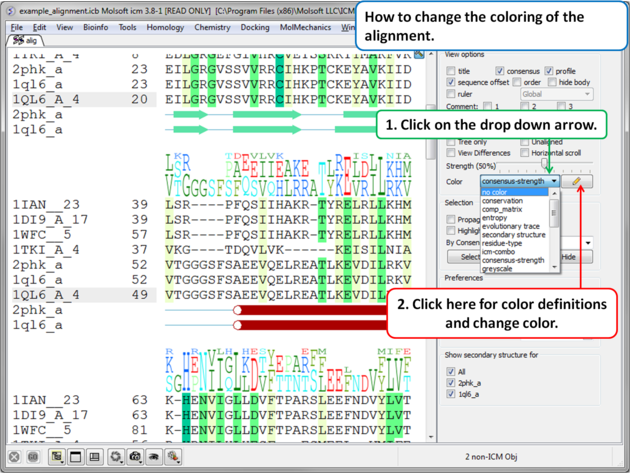
| NOTE: The colors are shaded from pale to bright where the brighter color represents higher conservation at that point in a multiple alignment. |
To view the alignment color key:
- Click the pencil icon next to the color scheme selection tools and a table will be displayed.
To edit the alignment color key:
- Click the pencil icon next to the color scheme selection tools and a table will be displayed.
- Click on the "Edit Cells by Double Click" button on the right hand side of the table.
- Double click on a color panel in the table to change the color.
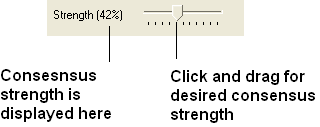
To color by strength of consensus:
To color your multiple alignment by the strength of consensus at each point in an alignment:
- Choose the Color option "Consensus Strength"
- Click and drag on the consensus strength button shown below:
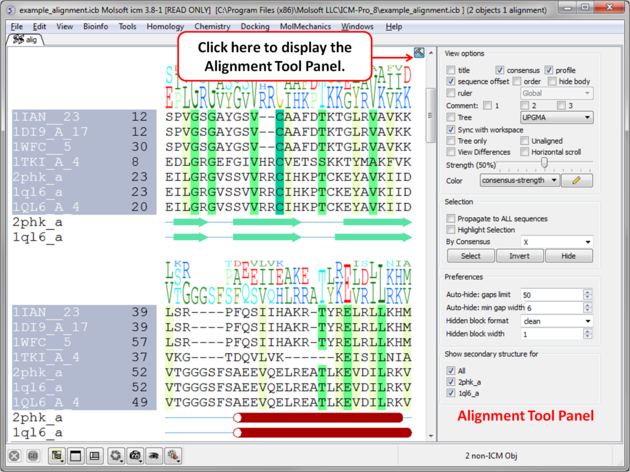
7.7.10 Alignment View Options |
The alignment view options are located on the right hand side of the alignment editor.
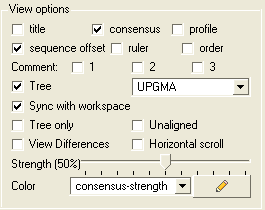
To add or remove the alignment title:
- Check the title box in the view options.
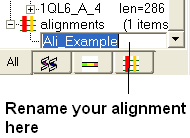
To rename an alignment:
- Right click anywhere in the alignment or on the alignment tab and a menu will be displayed.
- Select the 'Rename' option.
- Type the new name for your alignment in the data entry box which becomes activated in the ICM workspace (See below).
To add or remove the alignment consensus display.
- Check the box labeled 'consensus' in the view options.
![]()
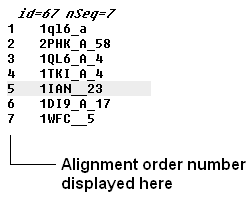
If you have a large alignment it may be convenient to show the number of each sequence
To number your alignment:
- Check the 'order' box in the view options.
Horizontal Scroll
To view the alignment in Horizontal scroll click on the "Horizontal scroll" button in the View Options panel in the Alignment tool bar.
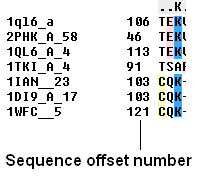
To view the sequence offset number for each of your sequences in an alignment:
- Check the 'offset' box in the view options.
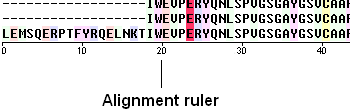
To view the sequence ruler:
- Check the 'ruler' box in the view options.
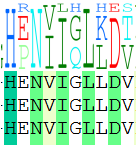
To view the sequence consensus.
- Check the consensus option in the view options.
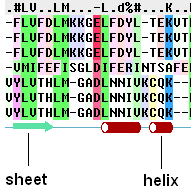
To view secondary structure.
If one of the sequences of the alignment is linked to a structure then you can display the secondary structure by:
- Check the "show secondary structure for" box.
The secondary structure will be displayed at the bottom of the alignment. The color code is: red cones = alpha helix, green arrows = beta sheet, blue cones = pi helix, magenta cones = 3/10 helix.
7.7.11 Alignment Gaps |
To make an alignment clearer you may wish to HIDE gap regions.
To hide all gap regions:
- Right click on the alignment and a menu as shown below will be displayed.
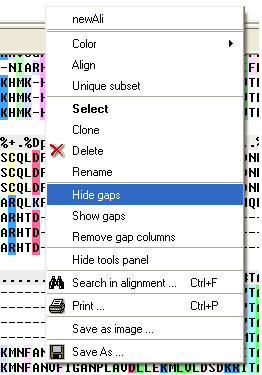
- Select the "Hide gaps" option.
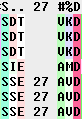
The gaps in your alignment will be hidden according to the preference made in the alignment tools panel shown below. Click on the drop down arrow in the "Hidden block format" data entry box.
Two parameters can be specified directly from the Tools Panel in the alignment window:
- the "Hidden Block Format can use the following special symbols:
- %l number of hidden chars
- %L length of the hidden block
- %f hidden from
- %t hidden to
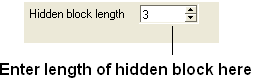
- the "Hidden block width" which defines the total length of the hidden section.
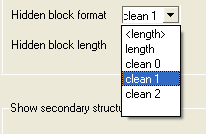
Some predefined hidden block formats are shown here:
length: displays the length of the gap
length: displays the length of the gap in <>.
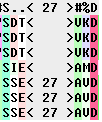
clean0: displays no indication of a gap
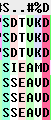
clean1: displays grey panel in the gap position.
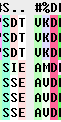
clean2: displays a wider grey panel in the gap position
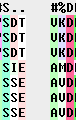
| NOTE: The width of the hidden panel can be changed as shown below. |
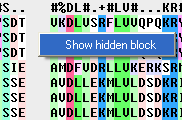
If you have hidden all the gaps individual gaps (or blocks) can be displayed by:
- Right clicking on the gap and select "Show hidden block" option.
To show all gaps:
- Right click on the alignment away from a gap region and a menu will be displayed.
- Select the "Show gaps option.
7.7.12 Searching an Alignment |
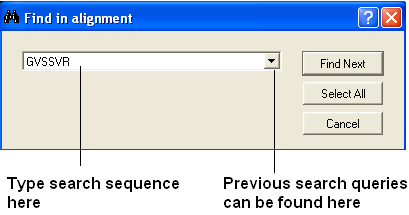
If you have a large alignment and you wish to find a specific group of amino acids within that residue the you can use the Alignment search tool.
- Right click on the alignment away from any hidden gaps and a menu will be displayed.
- Select the "Search in alignment option" and a data entry box as shown below will be displayed.
| NOTE: Another way of searching an alignment is to use the alignment selection tools which are linked to the ICM workspace and 3D graphical window. This is described in the section entitled Making Selections in Alignments. |
7.7.13 Making Alignment Selections |
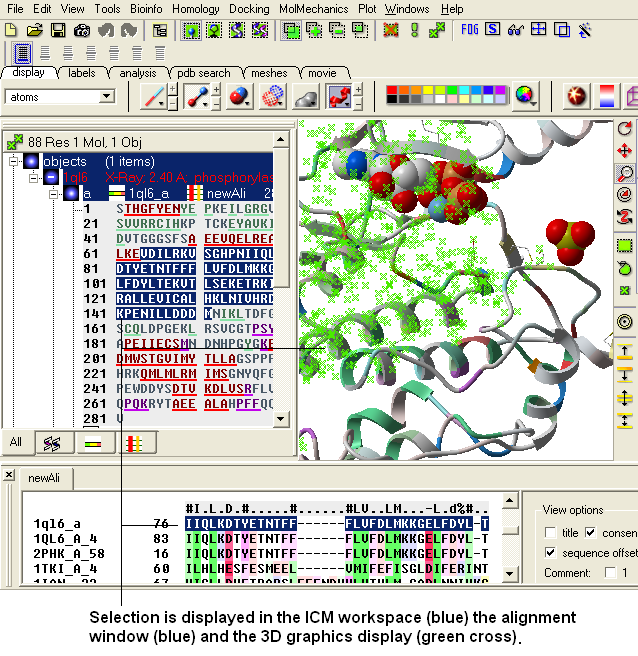
ICM has a very powerful alignment selection tool which enables sequences and structures to be interlinked with the 3D graphical window, the alignment window and the ICM workspace.
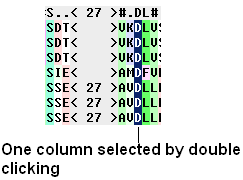
To select a single column of an alignment:
- Double click.
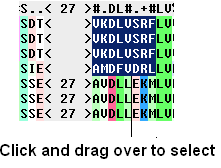
To select parts of an alignment:
- Click and drag over the region you wish to select.
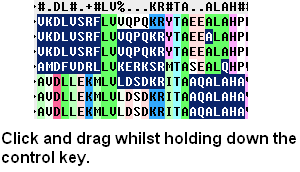
To select multiple discontinuous parts of an alignment:
- Click and drag whilst holding down the control key.
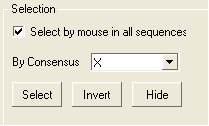
To enable the easy selection of all sequences in an alignment:
- Check the box labeled "Select by mouse in all sequences".
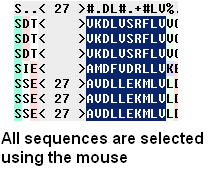
| NOTE: All selections made in the alignment window are linked to the 3D graphics window and the ICM workspace if a structure is in the alignment. |
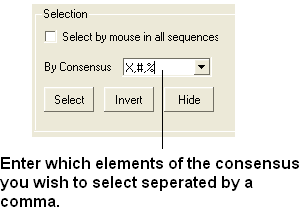
7.7.14 Select by Consensus |
This is a very useful tool, for example, you may want to color the consrved regions of your structure in the 3D display windowa different color to the rest of the structure. This tool allows you to select the conserved regions in the sequence alignment. Once the selection has been made it can be used for a number of different ICM operations such as coloring and displaying secondary structure.
A selection can be made based on the alignment consensus. The buttons relating to this are in the alignment tool panel.
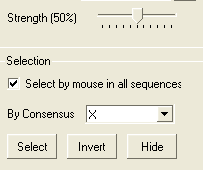
Before selecting by consensus you first need to define a consensus strength:
- Click and drag on the bar labelled "Strength" and select your desired percentage.
- Enter which elements of the consensus you wish to select separated by comma. Refer to the language manual for definition of each consensus symbol.
- Click the Select button and your selection will be highlighted in blue in the alignment windown and ICM workspace and as green crosses in the 3D graphical display window.
Once the selection has been made it can be used for a number of different ICM operations such as coloring and displaying secondary structure.
To invert a selection:
- Click on the invert button.
To hide a selection.
- Click on the Hide button
| NOTE: All selections made in the alignment window are linked to the 3D graphics window and the ICM workspace if a structure is in the alignment. |
7.7.15 Calculate Sequence Identitiy and Similarity |
To calculate the sequence identity and similarity between one sequence and other sequences in an alignment:
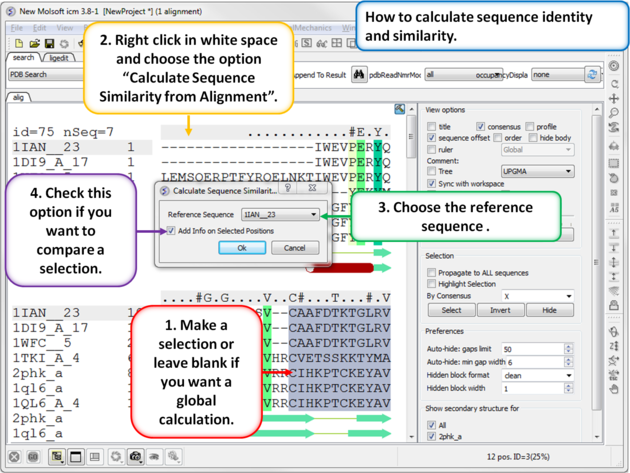 |
|
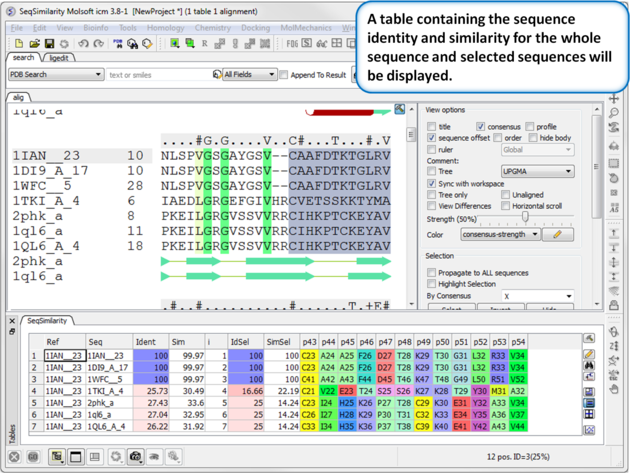 |
A table of sequence similarity and identity will be displayed. A guide to the columns in the table:
|
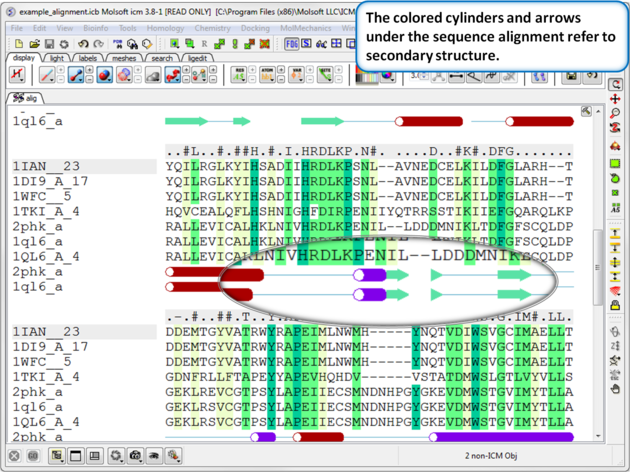
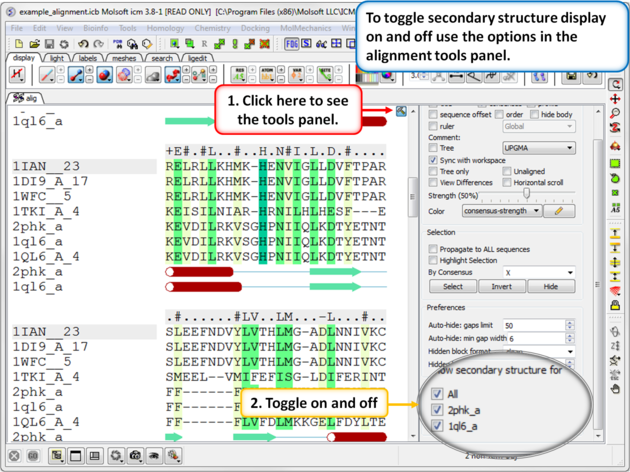
7.7.16 Alignment Secondary Structure |
If the one or more of the sequences contain secondary structure annotation then you will see colored cylinders and arrows under the alignment. Red Cylinder = alpha helix, green arrow = beta sheet, blue cylinder = pi helix, magenta cylinder = 3/10 helix.
Use the alignment tool panel to toggle the secondary structure display on and off.
| Prev Drag & Drop | Home Up | Next Color Structure by Alignment |