[ Dock Biotin to the Streptavidin Receptor | Re-Dock an Inhibitor to Ricin Crystal Structure | Covalent Docking ]
| Additional Resources: GUI Docs | Command Line Docs | Video | Method Description |
Objective
To dock biotin into the streptavidin receptor using the inbuilt example in Docking/Load Example.
Background
Streptavidin has very high affinity for biotin and the complex is used widely in molecular biology. The reasons for the high affinity is:
- High shape complementarity between the pocket and biotin.
- Extensive hydrogen bonds networks (> 8 hydrogen bonds)formed to biotin when in the binding site.
- The biotin-binding pocket is hydrophobic, and the ligand forms van der Waals contacts and hydrophobic interactions.
- Biotin stabilized a flexible loop contributing to its slow dissociation rate.
Instructions
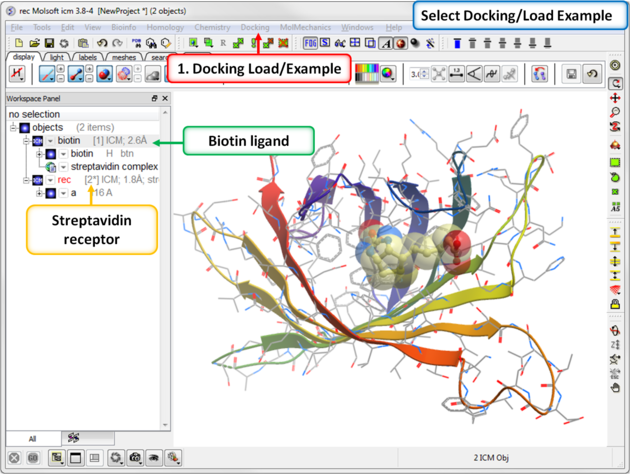 |
| Step 1: Load the Ligand and Receptor The 3D structures of biotin ligand and receptor streptavidin are provided in ICM. Go to Docking/Load Example. They molecules have already been converted to an ICM object.
|
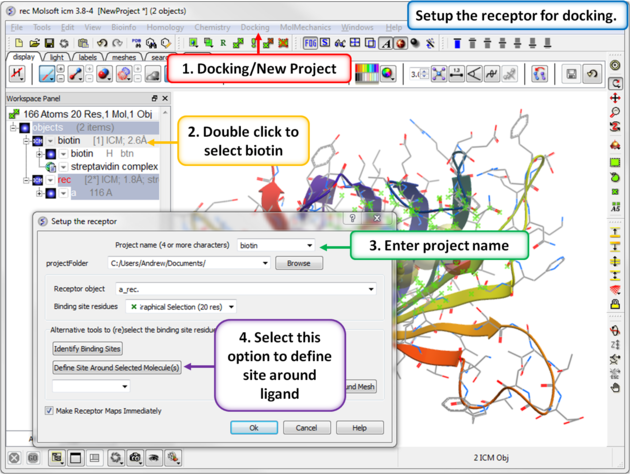 |
Step 2: Setup the receptor for docking.
|
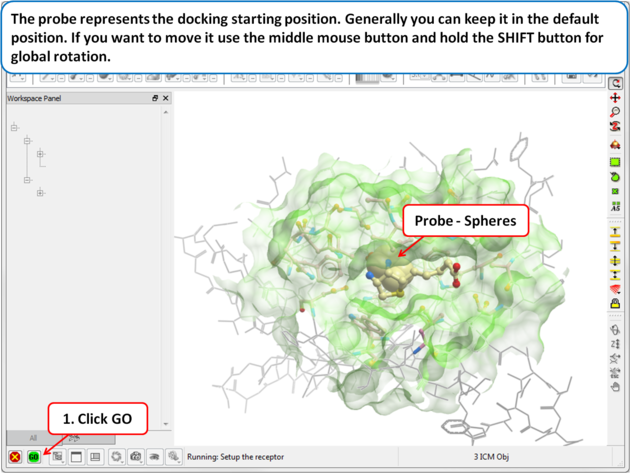 |
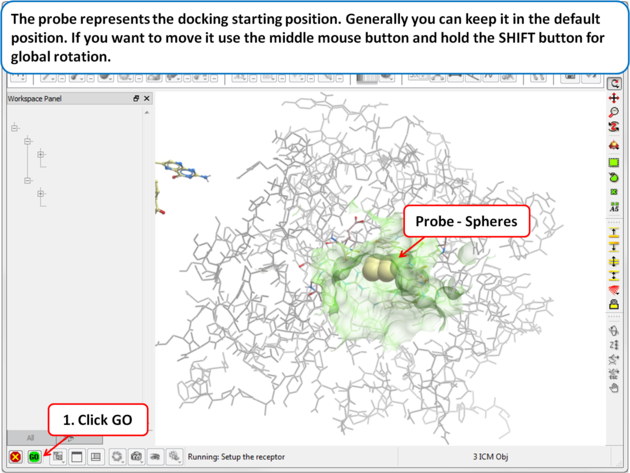
| Step 3: Probe The position of the probe (usually represented as 4 spheres in the center of the pocket) represents the initial position where sampling will begin. The default probe position is generally OK for most purposes but if you would like to move it to a critical part of the receptor so that sampling initially concentrates in that region you can do so using the middle mouse button and holding the SHIFT button for global rotation. Once you are happy with the position of the box press the enter key or click on "GO". |
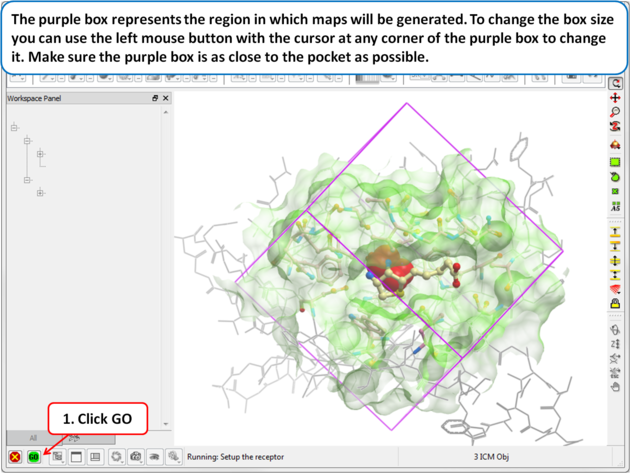 |
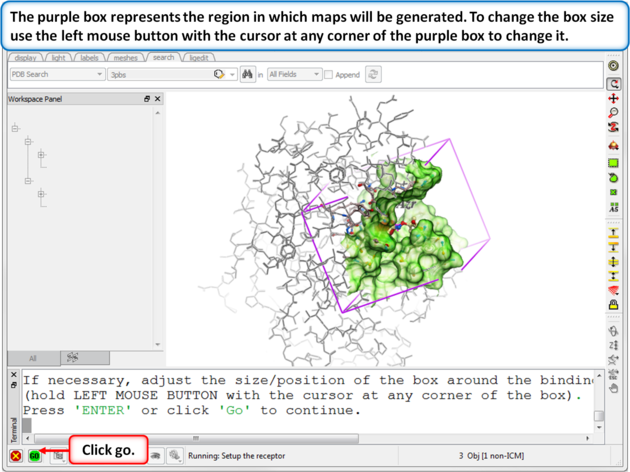
| Step 4: Maps
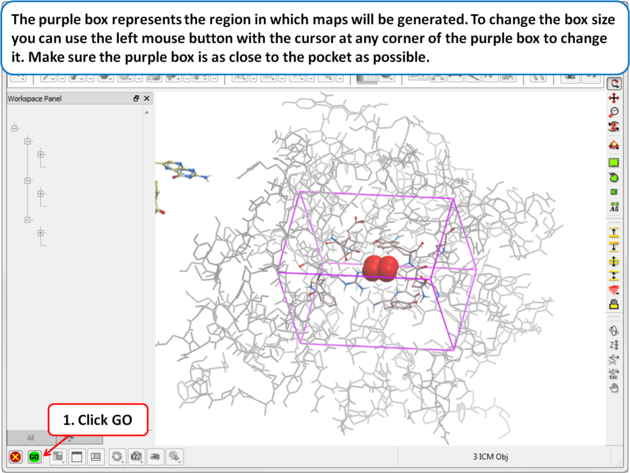
The purple box represents the region in which maps will be generated. The box needs to be large enough to encompass the binding pocket but not too large and including regions of the receptor which are not relevant for the ligand to bind. If the binding site is correctly defined in the earlier Receptor setup then the default box size is usually fine. If it is necessary to change the box size you can use the left mouse button with the cursor at any corner of the purple box to change it.
|
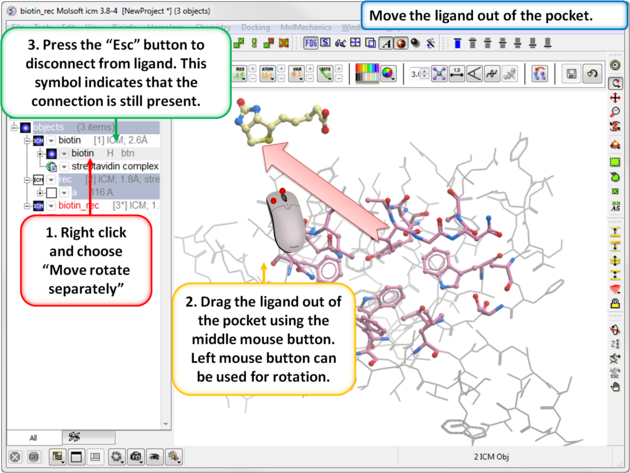 |
| Step 5: Move the Ligand out of the Pocket
IMPORTANT! If you are redocking a ligand please remember to remove the ligand from the ligand binding pocket otherwise the ligand will be included in the docking maps and you will not be able to re-dock it correctly. To remove a ligand from an object - right click on the ligand in the ICM Workspace and select "move from object". Simply undisplaying the ligand is NOT sufficient.
|
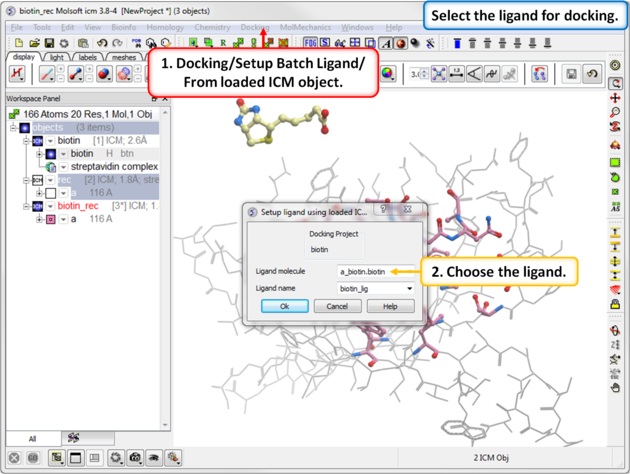 |
Step 6: Define the Ligand
|
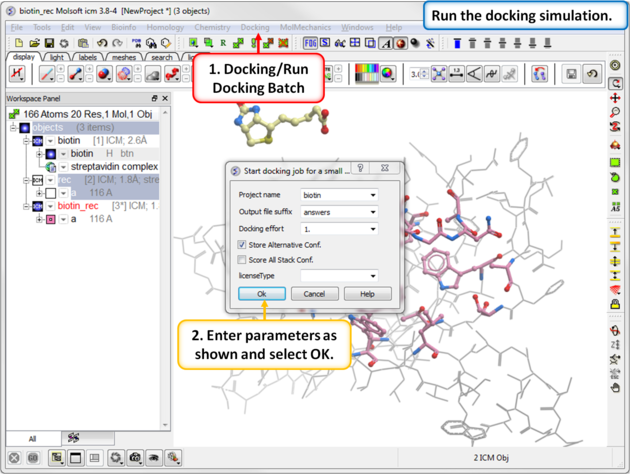 |
Step 7: Run the Docking
|
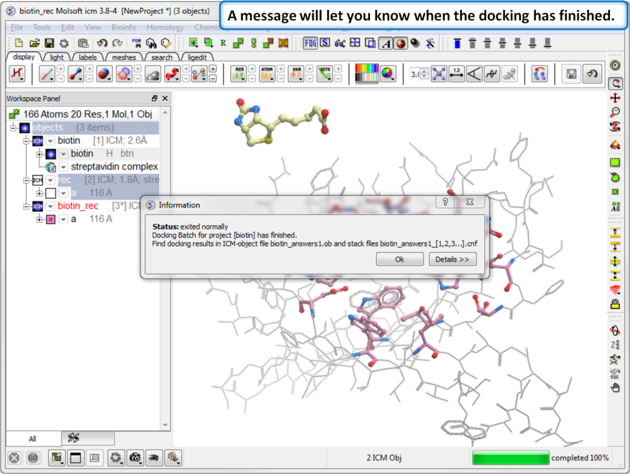 |
| Step 8: Docking Completed |
 |
| Step 9: View the Docked Ligand |
Documentation | Video Tutorial
ObjectiveRicin is a cytotoxin which can be used as a poison. There is a lot of interest in designing inhibitors to the ricin A chain. The objective of this tutorial is to re-dock a ricin inhibitor into the ricin crystal structure (1br6).
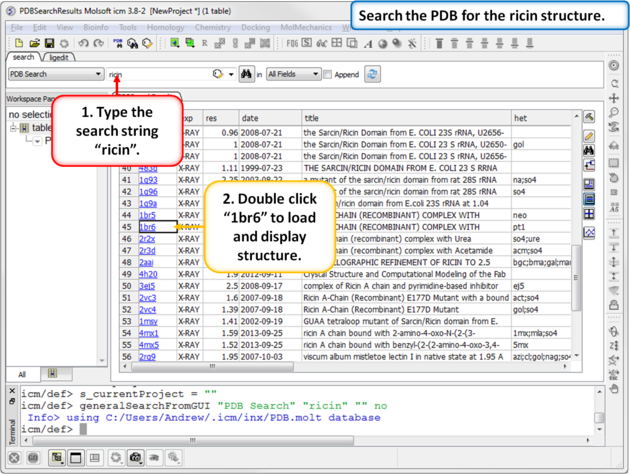 |
| Step 1: Search the PDB for ricin protein molecules and download PDB:1BR6. |
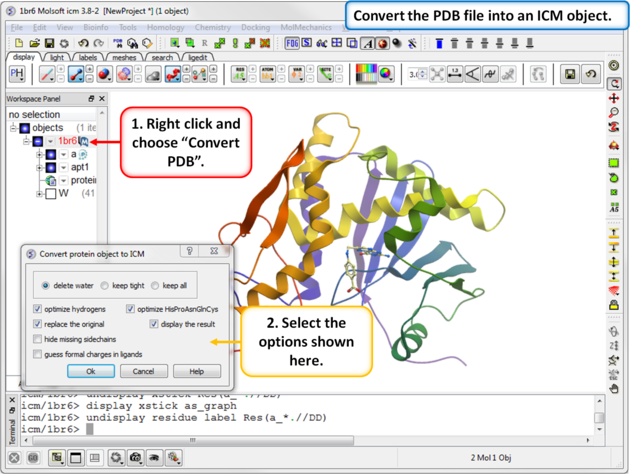 |
| Step 2: Convert the PDB file into an ICM object. |
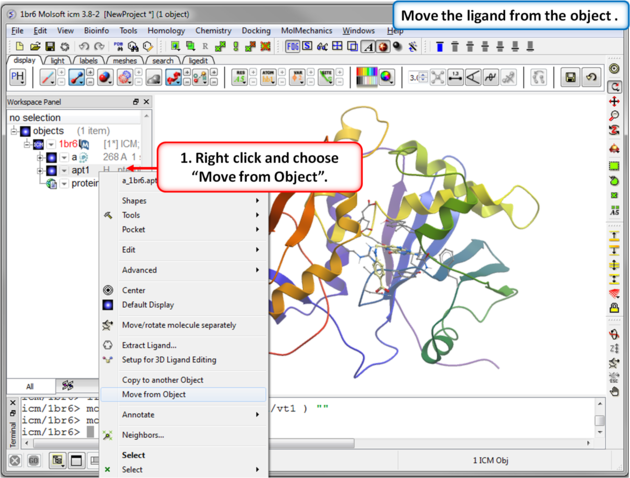 |
| Step 3: Move the ligand from the object so we can re-dock it. |
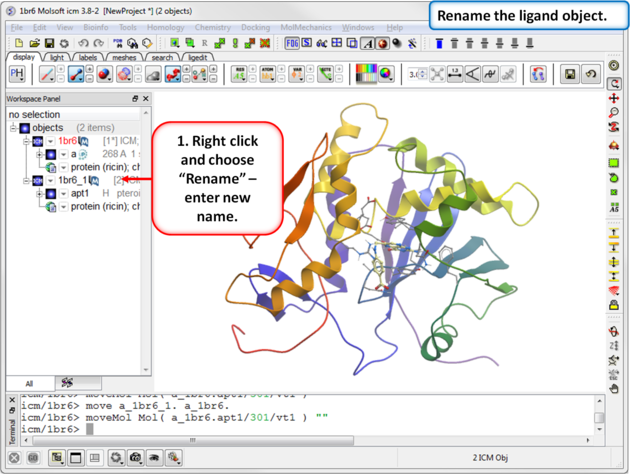 |
| Step 4: Rename the ligand object. |
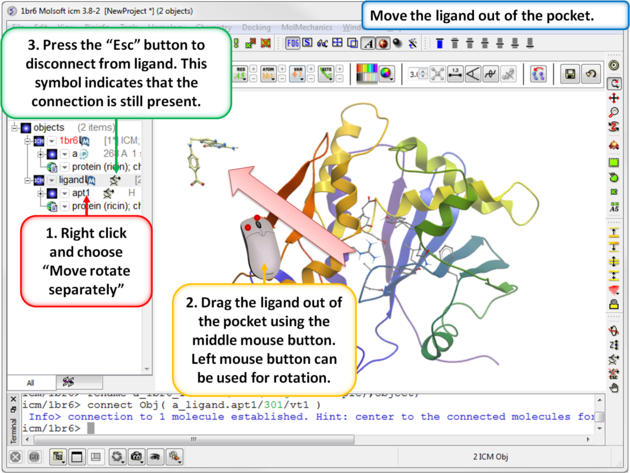 |
| Step 5: Move the ligand out of the pocket in the 3D display window. |
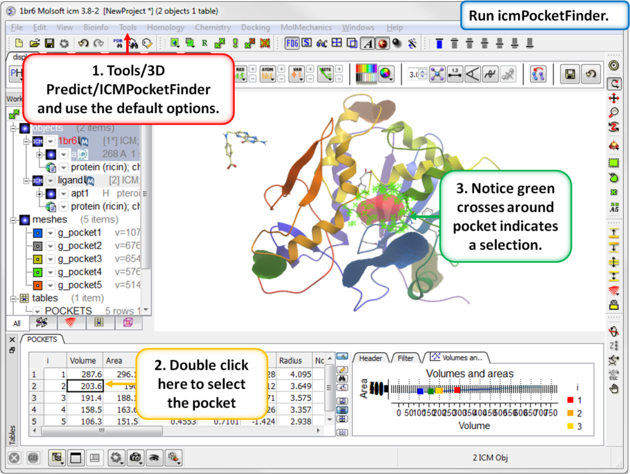 |
| Step 6: Use ICMPocketFinder to identify drug-like pockets in the ricin molecule. |
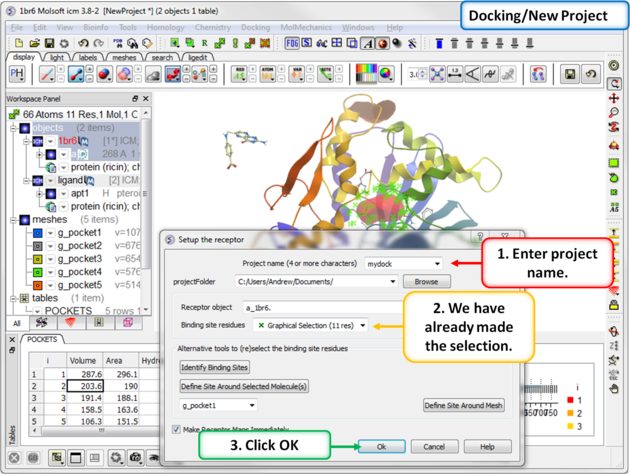 |
| Step 7: Start the docking setup. |
 |
| Step 8: The probe represents the docking starting position. Generally you can keep it in the default position. If you want to move it use the middle mouse button and hold the SHIFT button for global rotation. |
 |
| Step 9: The purple box represents the region in which maps will be generated. To change the box size you can use the left mouse button with the cursor at any corner of the purple box to change it. Make sure the purple box is as close to the pocket as possible. |
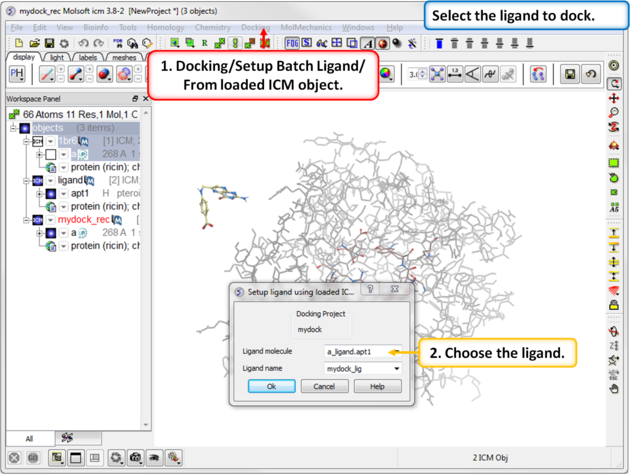 |
| Step 10: Select the ligand to dock. |
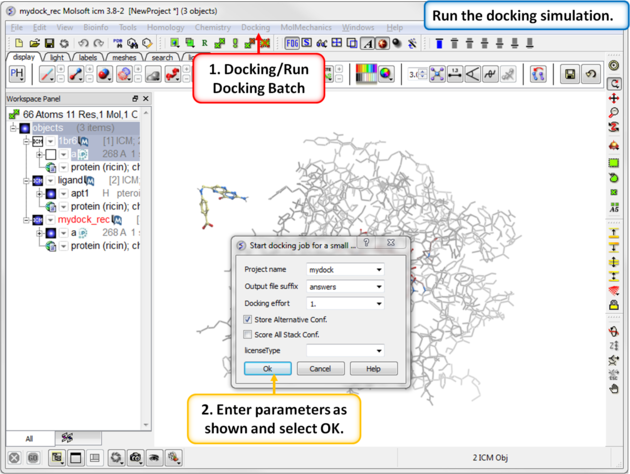 |
| Step 11: Start the docking simulation. The Docking Effort (formerly known as thoroughness) represents the length of the simulation. You can increase to 5 or 10 if you want to but it will take longer to dock the molecule. |
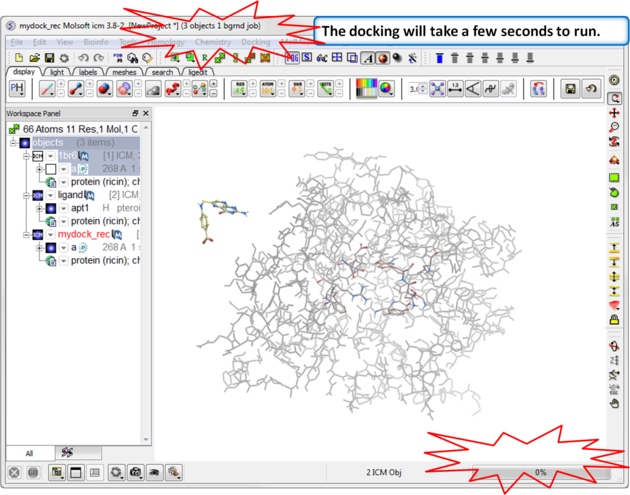 |
| Step 12: You can monitor the docking jobs by the progress bar or go to Windows/Background jobs. |
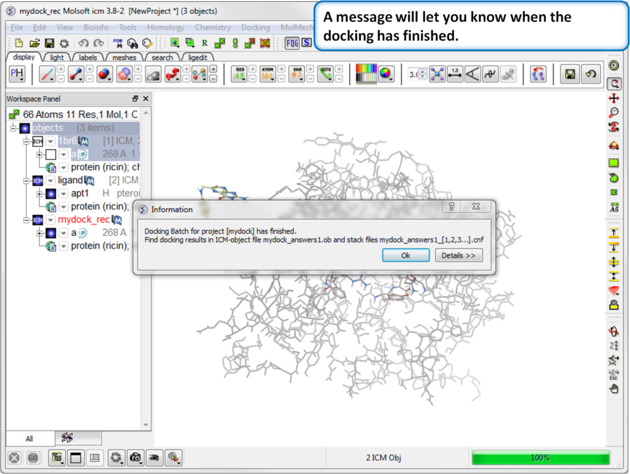 |
| Step 13: A dialog box will tell you once the docking is finished. |
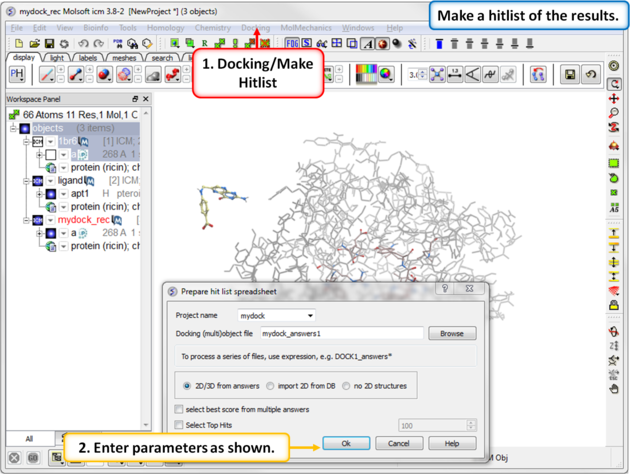 |
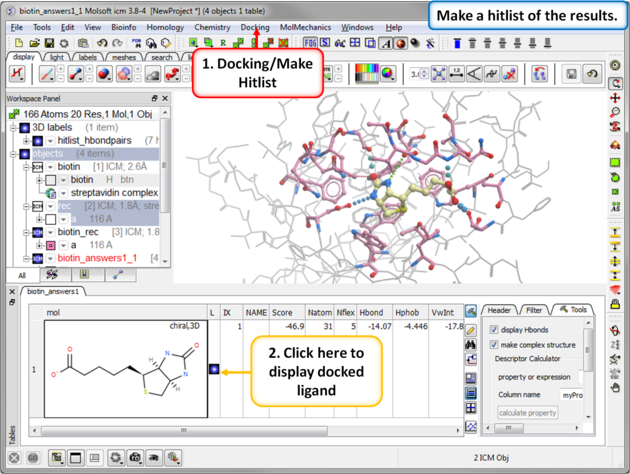
| Step 14: Make a docking hitlist. |
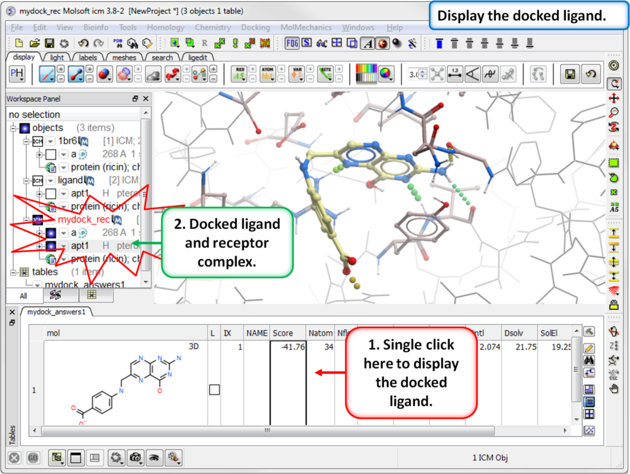 |
| Step 15: Display the docked ligand by double clicking on the table or use the toggle button in the "L" column. |
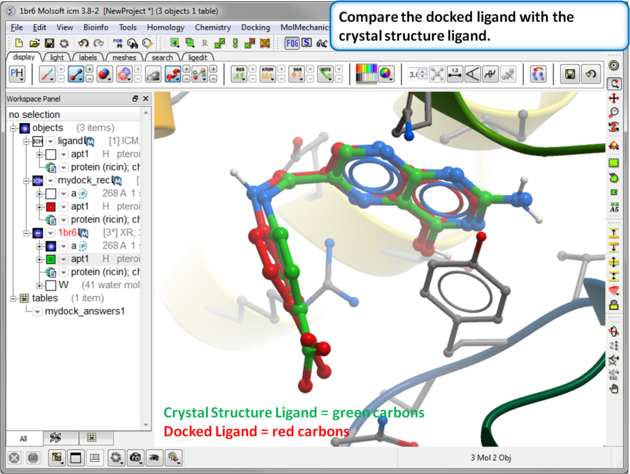 |
| Step 16: Compare the docked ligand with the crystal structure ligand. You can do this by re-reading the PDB structure in. You can measure the RMSD between the docked ligand and the crystal structure ligand using the Srmsd command http://www.molsoft.com/man/icm-functions.html#Srmsd using the option chemical. |
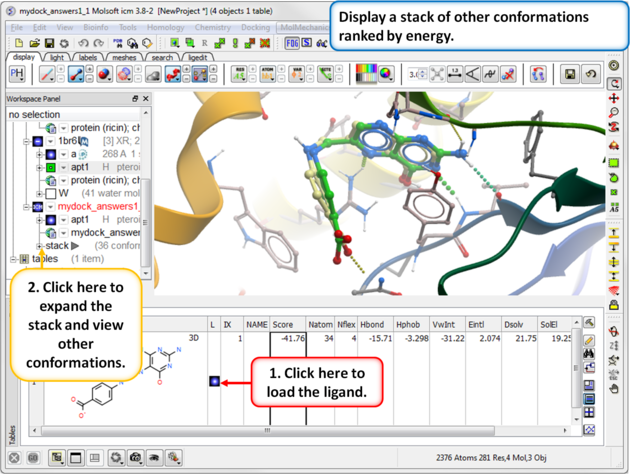 |
| Step 17: Use the toggle button to load a stack of other conformations of the ligand. |
Documentation | Video Tutorial
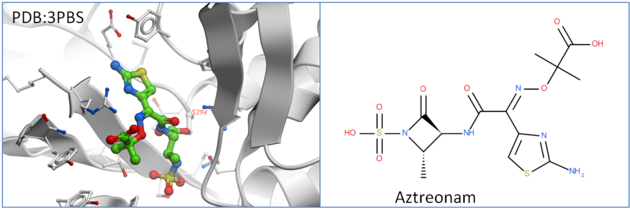
Penicillin-binding protein PBP3 is an essential enzyme responsible for the final steps of peptidoglycan synthesis which is a major component of the cell walls of bacteria. PBP is covalently inactivated by beta-lactam antibiotics which causes cell death and lysis and is an important therapeutic target. Aztreonam is a monocyclic beta-lactam antibiotic and was approved as a drug in 1986 (Squibb). It is a well tolerated drug and is used in patients who are allergic to penicillin. In this tutorial we are going to dock Aztreonam to PBP3 which covalently binds to SER294.
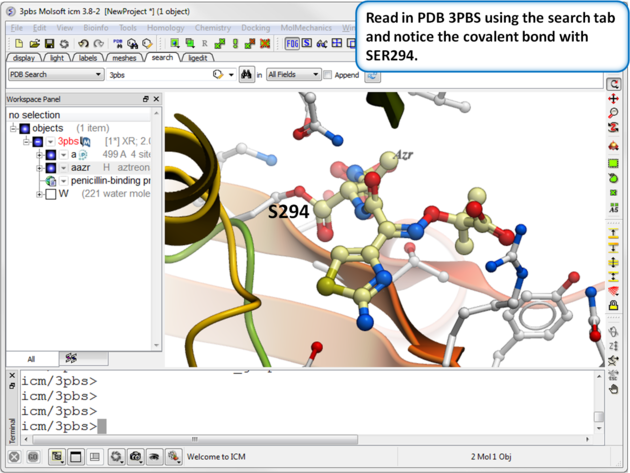 |
| Step 1: Read in the PDB file 3PBS using the search tab. |
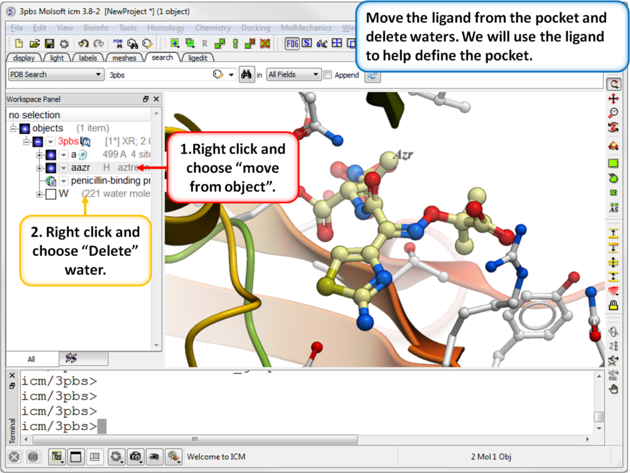 |
| Step 2: Move the ligand from the pocket and delete waters. We will use the ligand to help define the pocket. |
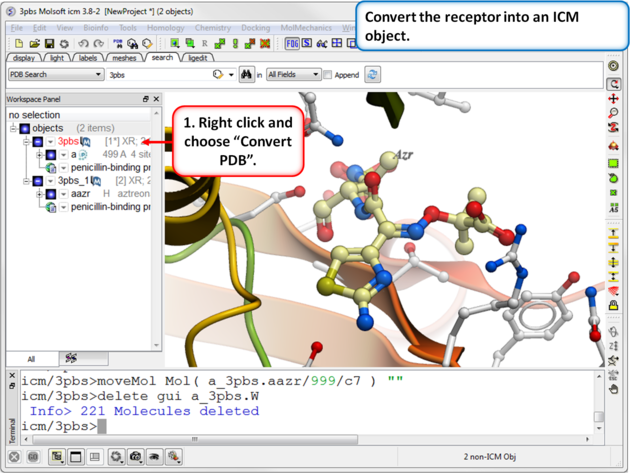 |
| Step 3: Convert the receptor into an ICM object. |
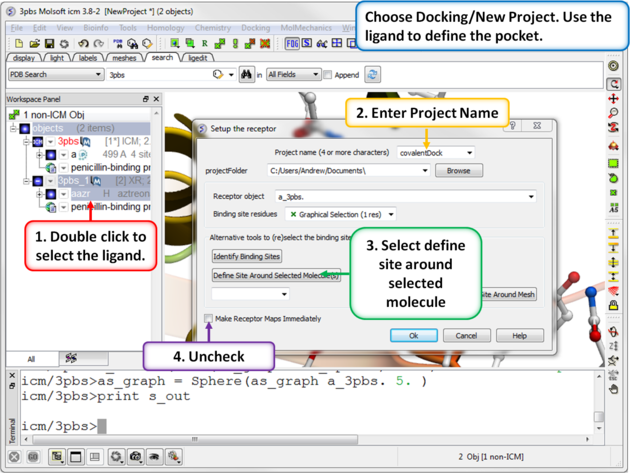 |
| Step 4: Choose the menu option Docking/New Project. Use the ligand to define the pocket. |
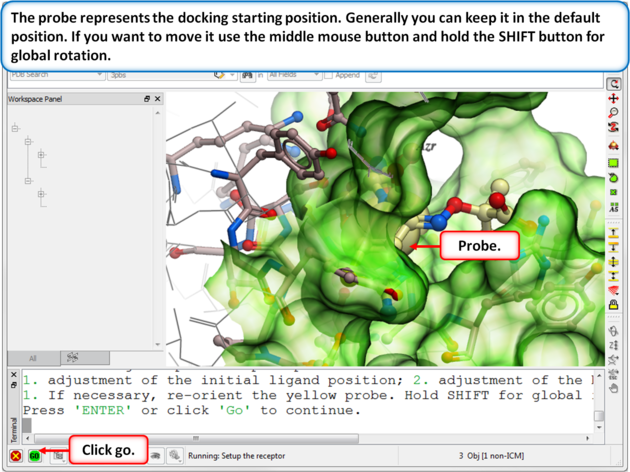 |
| Step 5: Usually the default position for the probe is OK so just select GO. |
 |
| Step 6: Change the diemensions of the purple box if needed. If you used the ligand to define the pocket then the box should be OK. |
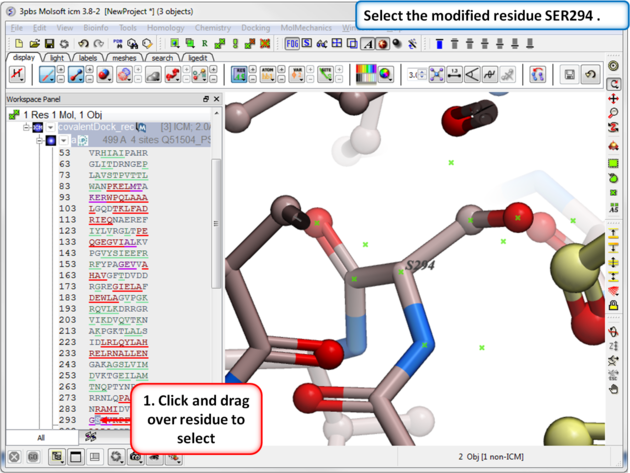 |
| Step 7: Select the modified residue SER294 in the docking project recepor (e.g.covalentDock_rec). |
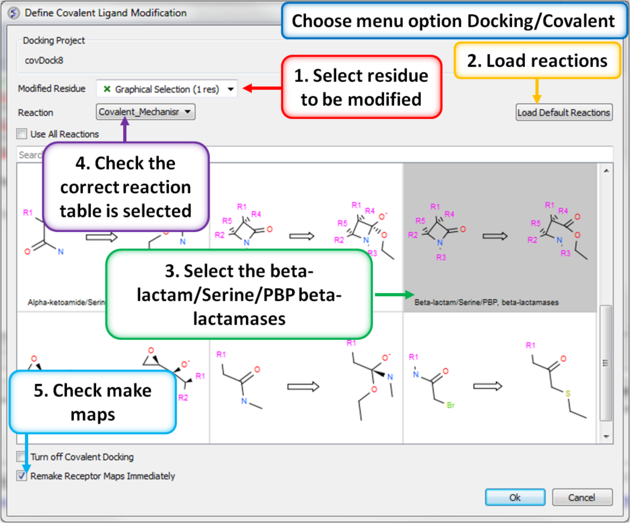 |
| Step 8: Define the covalent ligand modification. |
 |
| Step 9: Sketch the ligand Aztreonam ligand that we will dock. This is available in the dictionary. |
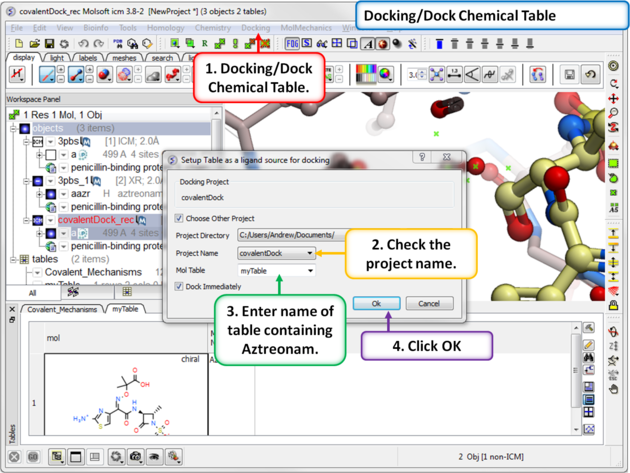 |
| Step 10: Dock the ligand using the menu option Docking/Dock Chemical Table. You can dock more than one ligand from a table but in this example we are just using one ligand. |
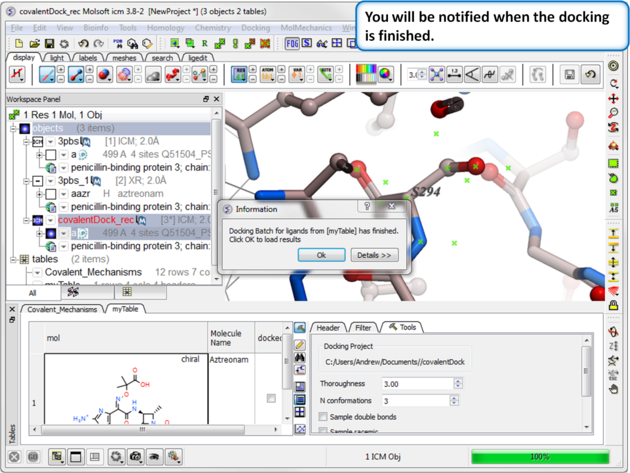 |
| Step 11: You will be notified when the docking has finished. |
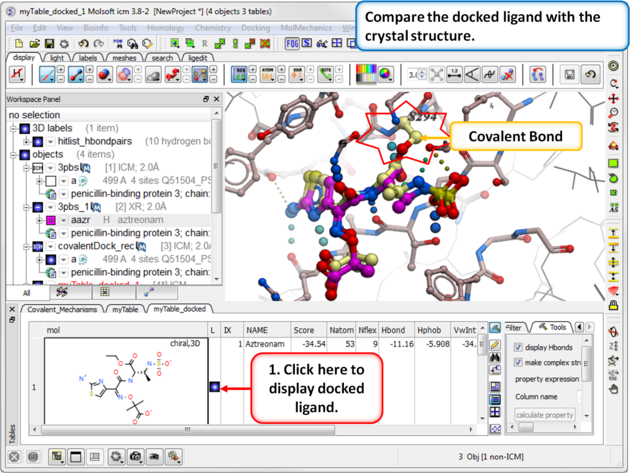 |
| Step 12: Compare the docked ligand with the one in the PDB complex. |