[ Default Alignment | Align Two Sequence | Sequence to Structure Alignment | Align DNA vs Protein | Multiple Sequence Alignment | Drag & Drop ]
| Available in the following product(s): ICM-Pro |
To make an alignment using the default parameters:
 |
|
Alignment parameters (such as alignment method) can be changed using the options in the Bioinfo menu (e.g. Align Two Sequences and Multiple Sequences).
To align two sequences:
- Read into ICM two or more sequences.
- Bioinfo/Align Two Sequences
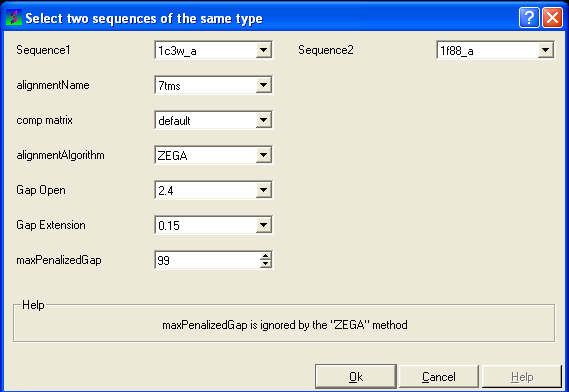
- Enter the name of your first sequence in the 'Sequence 1' data entry box.
- Enter the name of your second sequence in the 'Sequence 2' data entry box.
| NOTE: Any sequences already loaded into ICM can be seen by clicking on the down arrow next to the 'Sequence 1 and 2' data entry boxes. This can save typing and trying to remember what you called your sequence. |
- Enter a unique alignment name in the 'alignmentName' data entry box.
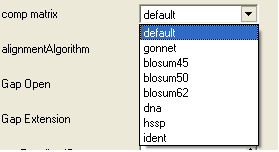
- Select a comparison matrix from the list shown below by clicking on the arrow next to the 'comp matrix' data entry box.
- Select the alignment algorithm you wish to use from the list shown below by clicking on the arrow next to the 'alignmentAlgorithm' data entry box.
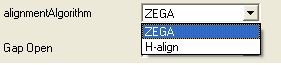
ZEGA - a Zero End-gap Global Alignment, that is a pairwise alignment method based on the Needleman and Wunsch algorithm modified to use zero gap end penalties. This type of alignment was first described by Michael Waterman, who called it the "fit" alignment. The paper of Abagyan and Batalov, 1997 describes the statistics of the structural significance of the alignment score and optimization of the alignment parameters for the best recognition of structurally related proteins.
H-Align - alignment method used in the Align and Score functions and find database command (as described in Batalov and Abagyan, 1999)
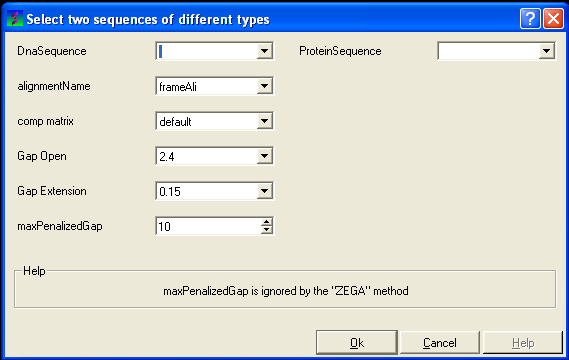
- Enter the values you wish to use for Gap Open, Gap Extension and the maximum penalized gap penalty.
Gap Open The absolute gap penalty is calculated as a product of gapOpen and the average diagonal element of the residue comparison table You may vary gapOpen between 1.8 and 2.8 to analyze dependence of your alignment on this parameter. Lower pairwise similarity may require somewhat lower gapOpen parameter. A value of 2.4 (gapExtension=0.15) was shown to be optimal for structural similarity recognition with the Gonnet et. al.) matrix, while a value of 2.0 was optimal for the Blosum50) matrix ( Abagyan and Batalov, 1997).
Gap Extension The absolute gap penalty is calculated as a product of gapExtension and the average diagonal element of the residue comparison table.
maxPenalizedGap The maximum penalized gap which is used for Gap Open and Extension
- Click OK and the alignment will be displayed in the alignment editor window at the bottom of the graphical user interface.
- Remember to save the project or write the alignment if you wish to keep the alignment for use at another time.

This option allows you to align a sequence to a template structure sequence using secondary structure weighting.
- Read into ICM the sequence (ModelSeq) you wish to align to the template sequence.
- Read in the template (TemplateSeq) structure and extract the sequence from this structure
- Bioinfo/Sequence to Structure Alignment
- Enter the ModelSeq and the TemplateSeq name
- Enter the name you wish to call the alignment.
- Enter the weights you wish to use for apha and beta secondary structure. The default values have been very well tested.
- This function uses a dynamic algorithm to find the alignment of the locally structurally similar backbone conformations. The RMSD is calculated within a certain residue window. The default is 3.
- Press OK and the alignment will be displayed in the bottom of the gui interface.
To align DNA to protein:
- Select the 'Bioinfo' menu.
- Select the option Align DNA vs Protein
- Follow the data entry instructions shown in the previous section entitled "align two sequences" but enter one DNA sequence and one protein sequence.
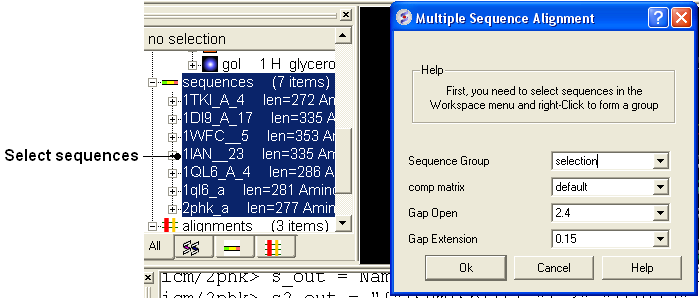
To align more than 2 sequences:
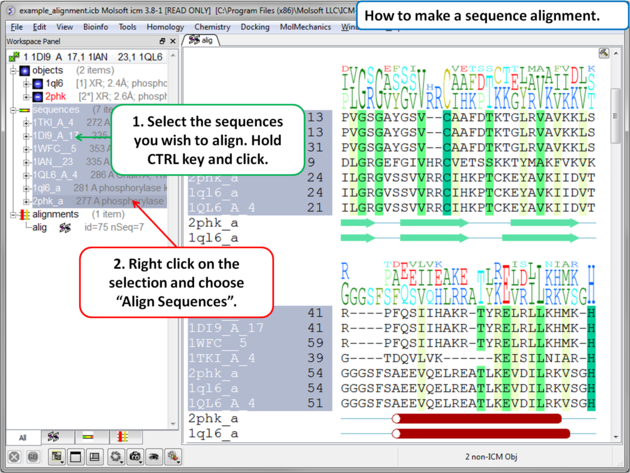
- Read into ICM the sequences you wish to align.
- Select the sequences you wish to align in the ICM workspace. A sequence can be selected by double clicking (highlighted blue in ICM workspace) - a range of sequences in the ICM Workspace can be selected by holding down the SHIFT button and double clicking. A non-contiguous selection can be made by holding down the CTRL button and double clicking.
- Bioinfo/Multiple Sequence Alignment
- Enter the name of the sequence group. If you selected the sequences as described above then the name of the group is selection. Other named groups of sequences can be made by right clicking on the sequence selection.
- Select the comparison matrix you would like to use.
- Enter Gap open and extension values.
Gap Open The absolute gap penalty is calculated as a product of gapOpen and the average diagonal element of the residue comparison table You may vary gapOpen between 1.8 and 2.8 to analyze dependence of your alignment on this parameter. Lower pairwise similarity may require somewhat lower gapOpen parameter. A value of 2.4 (gapExtension=0.15) was shown to be optimal for structural similarity recognition with the Gonnet et. al.) matrix, while a value of 2.0 was optimal for the Blosum50) matrix ( Abagyan and Batalov, 1997).
Gap Extension The absolute gap penalty is calculated as a product of gapExtension and the average diagonal element of the residue comparison table.
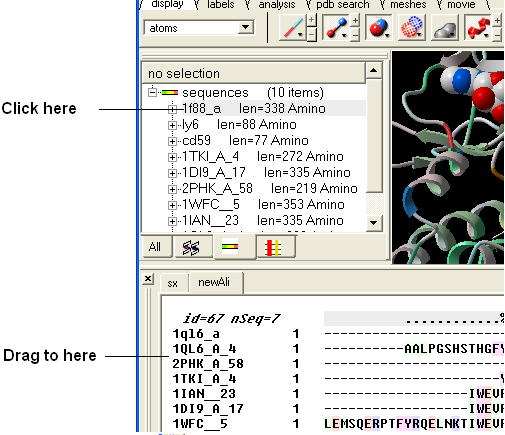
An easy way to add another sequence to an alignment is to drag and drop a loaded sequence from the ICM workspace panel to the alignment window. The sequence automatically becomes part of the alignment.