[ Graphical Selection | Quick Selection | Selection Levels | Selection Check | Orange Selection | Clear Selection | Change Selection | Filter | Workspace Selections | Workspace Navigation | Select Object | Select Molecule | Select Residue | Select All | Neighbors | Neigh/Graphical | Neigh/Workspace | Residue Number | Alignment and Table | Links | Tags ]
| Available in the following product(s): ICM-Browser | ICM-Browser-Pro | ICM-Pro | ICM-Chemist |
| Note: Click Next (top right hand corner) to navigate through this chapter. Headings are listed on the left hand side (web version) or by clicking the Contents button on the left-hand-side of the help window in the graphical user interface. |
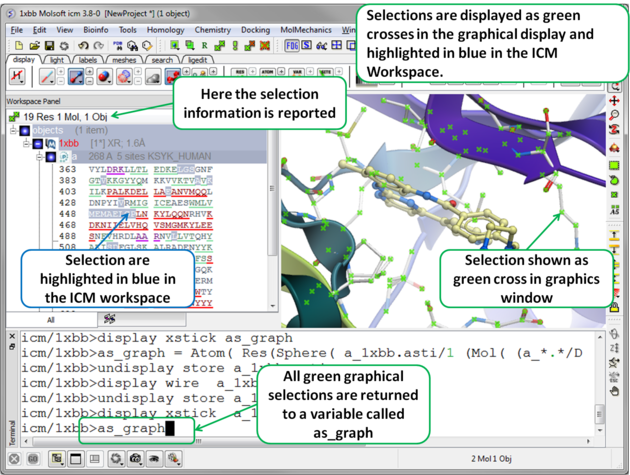
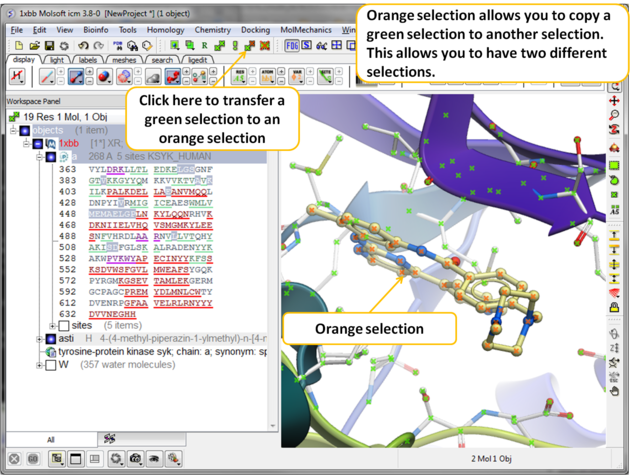
There will be many occasions when you will have to make selections. For example, if you want to display a particular region or molecule contained within your protein structure or if you want to select residues around a binding pocket. If you have a molecule displayed in the graphics window, then selections will be displayed as green crosses. The selection you have made is also displayed at the top of the ICM Workspace. It is always a good idea to keep an eye on what is selected and what is not.
There are four basic levels of selection
- Object (eg a PDB structure or ICM object)
- Molecule
- Residue
- Atom
You can make selections in:
- The Graphics Display
- The ICM Workspace (Selections are highlighted in blue)
- Tables
- Sequences
- Plots
- Alignments
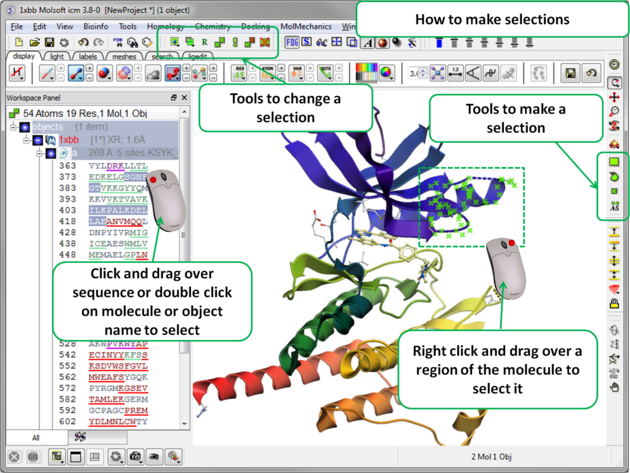
The following buttons can be used to make a selection once a structure is displayed.
| NOTE: All selection tool buttons are colored green. Graphical selections are represented as green crosses. |
To make a quick selection the following buttons can be used.

To select parts of your structure:
- Click on the Rectangular selection icon and click and drag around the part of the structure you wish to select.
OR
- Click on the Lasso selection icon and click and drag your mouse around the area of the structure you wish to select, forming a lasso around it.
To pick individual atoms:
- Click on the 'pick atom' button
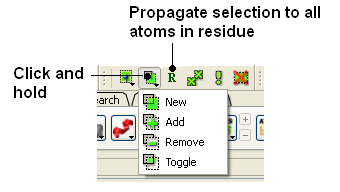
It is possible to change the level of selection before or during the building of a selection. The selection level drop-down button can be used to do this (see image below).
For example, a C-alpha of a residue is selected but one would like to select all atoms in the residue. You can change the level to Residues. This selection can then be changed into all atoms of the residue by then selecting the Atoms level again. Or you can use the Propagate Selection to all Atoms button (see image below).
- Click on the Select objects , Select molecules, Select residues, or Select atoms icon, depending on which part of the structure you wish to be highlighted.
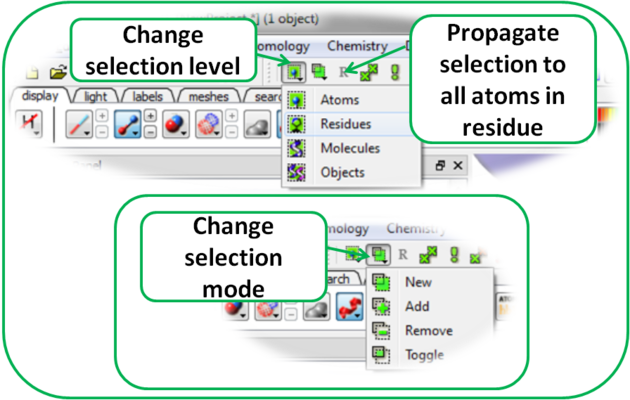
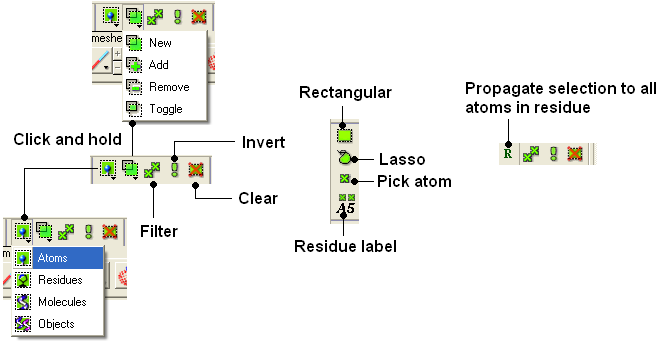
It is also important to observe the selection mode that is being used. There are four modes:
- New: new selection replaces everything selected before
- Add: new selection is added to previous selection(s), if any
- Remove: previously selection (part or whole of it), if included in the new selection will be unselected.
- Toggle: within the new selection, everything that has been selected is unselected and everything that hasn�t been selected, wilbe selected
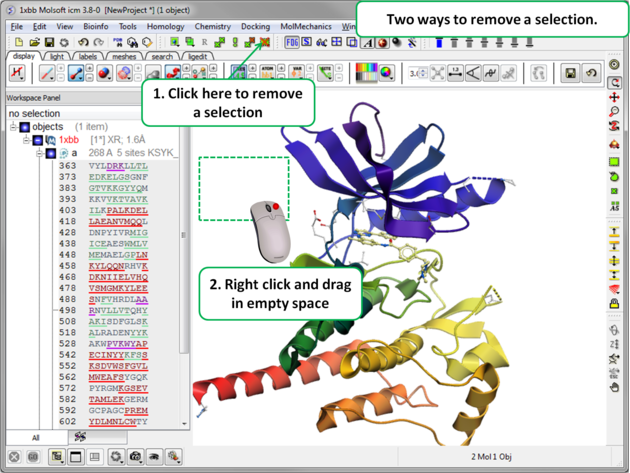
To unselect everything you have previously selected:
- Simply click on the Clear Selection button on the selection toolbar.
OR
- Right click and drag away from the displayed structure.
Once you have made a selection you may wish to add or remove parts of the selection. The buttons shown below allow you to accomplish this.
To add or remove from your current selection:
- Click on the Selection mode: add or Selection mode: remove icon on the toolbar.
- Click and drag around the part of your structure you wish to add or remove.
You may also wish to invert your selection in a specific part of the structure.
The parts that are currently selected will become unselected, and the unselected parts will become selected.
In order to invert a selection:
- Click on the Invert icon on the toolbar.
If you wish to select and unselect certain regions of a selection the toggle selection button is very useful.
- Click on the Toggle selection button.
- Right click around the selections you wish to select or unselect.
| NOTE: The selection you have made is recorded at the top of the ICM workplace. Any selection is stored in the variable as_graph. |
You may want to be very specific about a selection you want to make. For example you may only want to select protein backbone atoms or you might want to just select the charged residues.
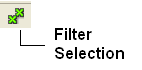
The button shown below enables you to filter your selection:
Or
Right click on a selection and a menu as shown below will be displayed.
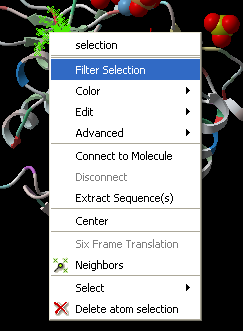
- Select the Filter Selection option.
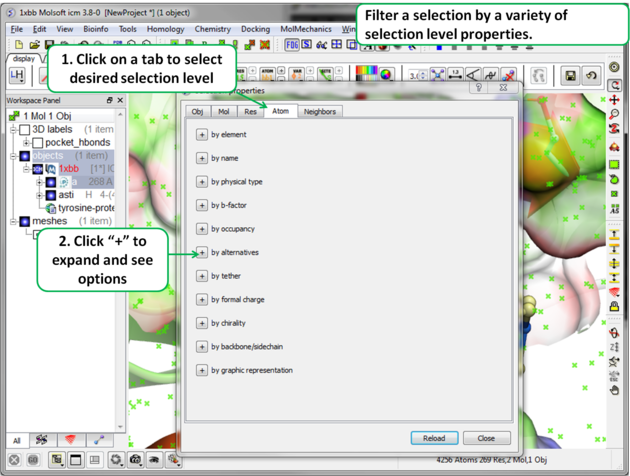
- A dialog box will be displayed as shown below.
- Select what level of selection you want e.g. atom or residue.
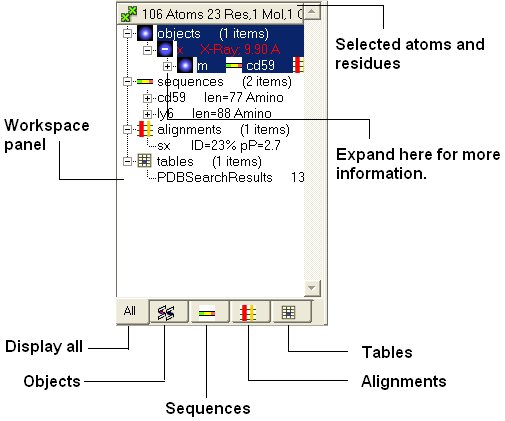
In the default GUI layout the workspace panel is located to the left of the 3D graphics display. It is a great tool for keeping track of all your sequences, pdb structures, objects, tables and alignments. As you will see in this section it also provides a way of making selections.
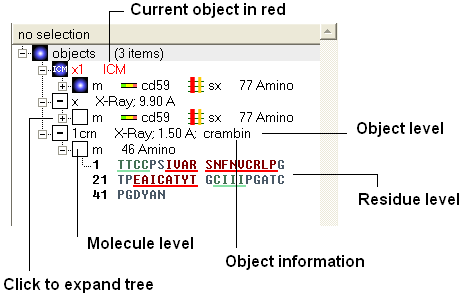
Once you have mastered how to navigate the ICM workspace making a selection will become easier. Each object is divided into 3 levels:
- Object Level - Shown in red if it is the current object. Holds details about the structure - name, X-ray, NMR, resolution etc. Importantly it will state whether the structure is an ICM object or a structure straight from the PDB. To learn how to convert a PDB into an ICM object go to the section on converting a PDB.
- Molecular Level - Shows the individual subunits, ligands and hetatoms of a molecule.
- Residue Level - Shows the sequence.
| NOTE: You can expand each level of the ICM workspace by clicking the "+" button as shown above. |
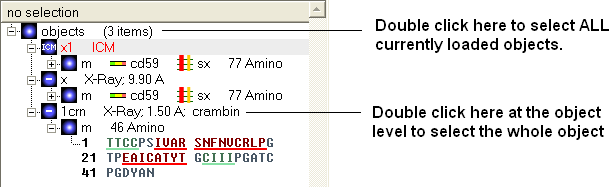
To select the whole object:
- Double click on the object level.
Use the CTRL button to select multiple non-contiguous objects or if they are continuous you can use double click and hold the tab button.
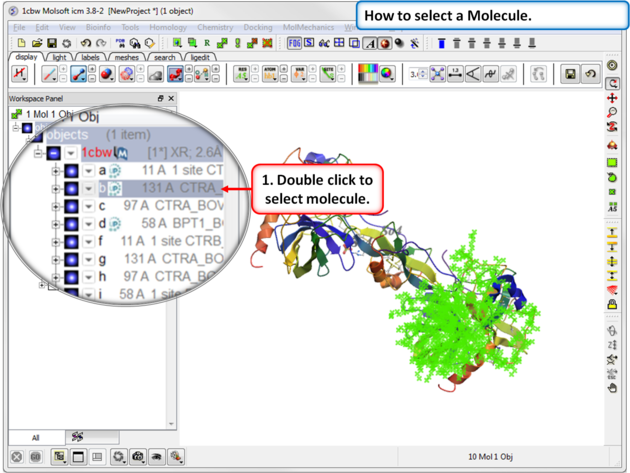
To select a molecule(s):
- Double click on the molecule in the ICM workspace.
Use the CTRL button to select multiple non-contiguous molecules or if they are continuous you can use double click and hold the tab button.
There are different options to select residues:
OPTION 1:
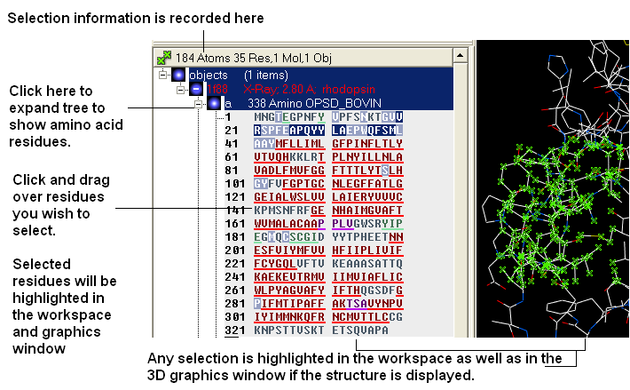
- Click and drag over the residues you wish to select in the ICM workspace. Selected residues will be highlighted in dark blue in the workspace and with green crosses in the graphical display.
OPTION 2:
- Click on the rectangular selection icon or lasso selection icon on the toolbar.
- Click and drag around the residues you wish to select. Selected residues will be displayed by green crosses on the graphical display and blue in the ICM workspace.
- Use the propagate selection to residue level button.
OPTION 3:
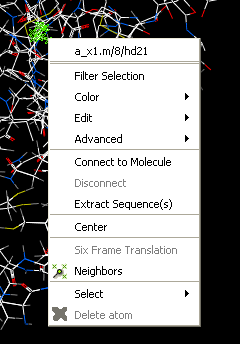
- Right click on the a residue in the graphical display and a menu as shown here will be displayed.

- Click on Select and a further menu will be displayed.
- Click on Residue, Molecule or Object.

OPTION 4:
Use the select residue button.
Ctrl + A will select everything in the ICM workspace, and Ctrl + Shift + A will unselect your objects.
| NOTE: The selection you have made is always recorded at the top of the ICM workplace. If you are familiar with using the ICM terminal (See language manual) the atoms, residues, molecules or objects selected interactively in the graphics window are automatically s |
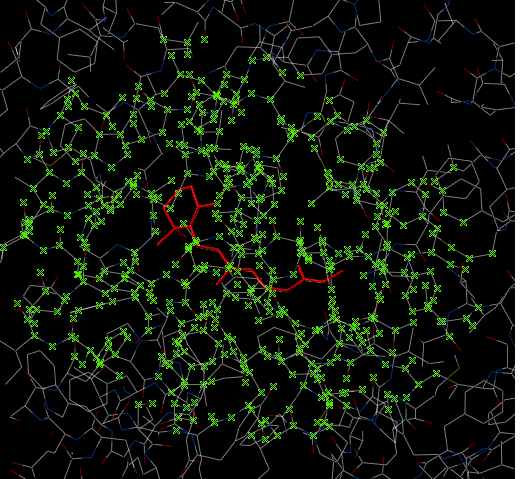
In some instances you may only want to display or select only a subset of a structure. For example you may only wish to display the residues surrounding a ligand (as shown below (ligand red; graphical selection green crosses). The "Selecting Neighbors" option selects the residues within a shpere of a defined radius.
There are two ways of selecting neighbours to a particular atom or residue in ICM. Either by right clicking on the atom or residue in the graphical display or by right clicking in the ICM workspace.
To select neighboring atoms or residues around a sphere of a certain radius:
- First select the residue(s) or atom(s) around which you wish to select neighbors. (See the Selection Toolbar Section)
- Right click on the selection and a menu as shown below will be displayed or choose Tools/Geometry/Neighbors.
- Select the Neigbors option and a data entry box as shown below will be displayed.
This option will allow you to make a spherical selection.
The window will open as displayed as below:
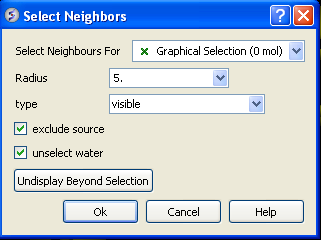
- Select the molecule you wish to select neighbors around. For example you can select a ligand in the ICM Workspace and then choose the Graphical Selection option in the "Select Neighbors For" dialog entry box. Or alternatively you can select the object by clicking on the drop down button next to the "Select Neighbors For" dialog entry box.
- Enter the radius in Angstroms for the neighbor selection. e.g. 5.
- Type - this option is important. This option relates to what is going to be selected. For example if you leave this option as visible and you only have ribbon representation displayed for your receptor (e.g. when selecting neighbors for a ligand) then only backbone atoms will be selected.
- visible - will select all atoms displayed within the radius selected.
- visible sidechains will select all visible side-chains - not backbone atoms.
- same_object_other_chains will select all atoms in other chains in the same object as the original selection.
- other objects will select atoms in objects other than the original selection.
- same object will select atoms in the same object as the original selection.
- all_objects will select atoms in all objects
- choose_from_list will allow you to select the object you wish to include in the neighbors selection.
- exclude source if checked will not include your original selection in the spherical selection.
- unselect water if checked will not select water molecules
- Undisplay Beyond Selection will only display the atoms selected.
NOTE: The selection you have made is always recorded at the top of the ICM workplace. If you are familiar with using the ICM terminal (See language manual) the atoms, residues, molecules or objects selected interactively in the graphics window are automatically saved in the variable as_graph. Graphical selections are shown in green (crosses) or highlighted in blue in the ICM Workspace. <>
To select neighboring atoms or residues around a sphere of a certain radius from a residue in the ICM workspace:
- First select the residue in the ICM workspace around which you wish to select neighbors. (See the Residue Selection)
- Right click on the selection and a menu as shown below will be displayed.
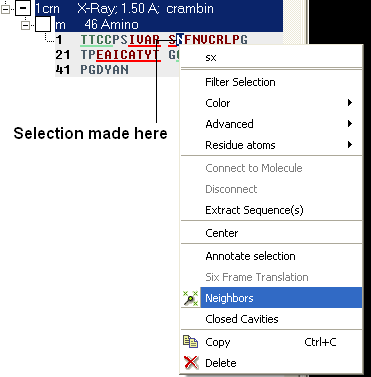
- Select the Neigbors option and a data entry box as shown below will be displayed.
- Follow the instructions in the previous section.
| NOTE: The selection you have made is always recorded at the top of the ICM workplace. If you are familiar with using the ICM terminal (see the ICM language manual) the atoms, residues, molecules or objects selected interactively in the graphics window are automatically selected into as_graph ICM-shell variable. |
To select by residue number:
- Right click on the molecule you wish to make the selection in and choose Select/Res Number...
- Enter the residue numbers e.g. 3,7:12,30 Colon indicates range.
Descriptions on how to make selections in Alignments and Tables are in the sections entitled Making Selections in Alignments and Making Table Selections.
It is sometimes necessary to make links between sequences objects and alignments. A link enables you to make selections in one environment such as an alignment and then these selections are transfered to the object such as the PDB structure displayed.
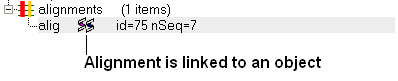
If a link is made then a symbol will be displayed next to the object in the ICM workspace. In the example shown below subunit_a of the X-ray structure 1ql6 is linked to the sequence 1ql6_a and the alignment called 'alig'.
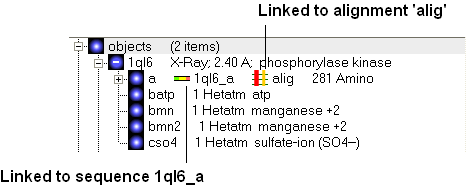
If an object is linked to an alignment a symbol as shown below will be displayed.
To link a sequence from an object - extract the sequence from the object.
- Right click on the object in the ICM workspace.
- Select extract sequence.
To link a sequence and object to an alignment.
Use the extracted sequence as described above to build your alignment.
In addition a link can be made between a structure and alignment by:
- Bioinfo/Link to Structure.
- Enter alignment name.
- OK
It is sometimes convenient to tag selections so you can come back and use them at a later date. To do this:
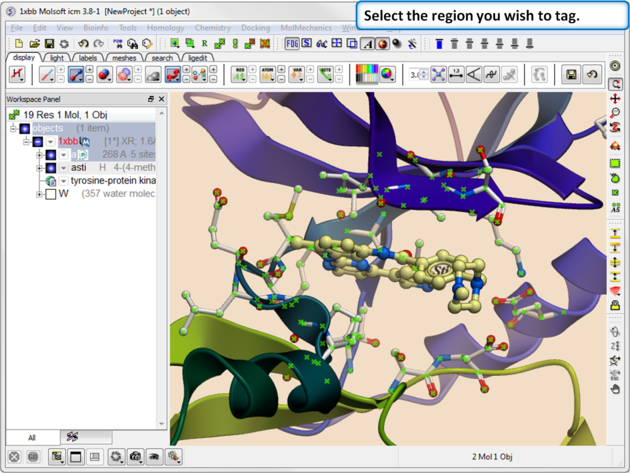 |
| Step 1. Select the region you wish to tag. |
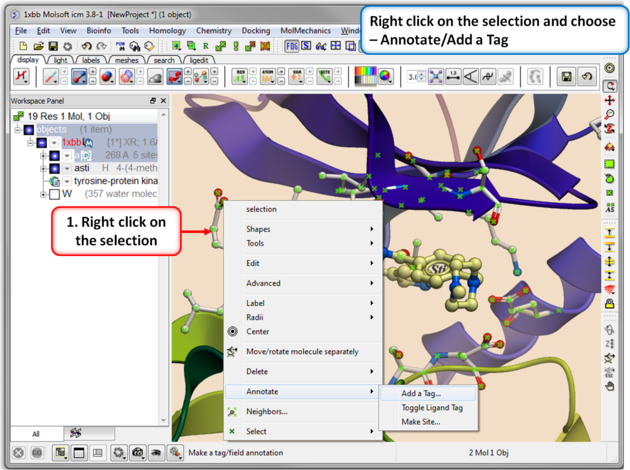 |
| Step 2. Right click on the selection and choose Annotation/Add a Tag. |
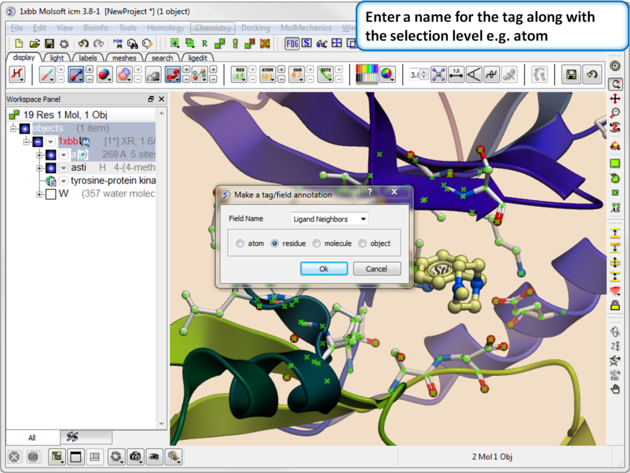 |
| Step 3. Give the tag a name and choose the selection level (atom, residue, molecule, or object). |
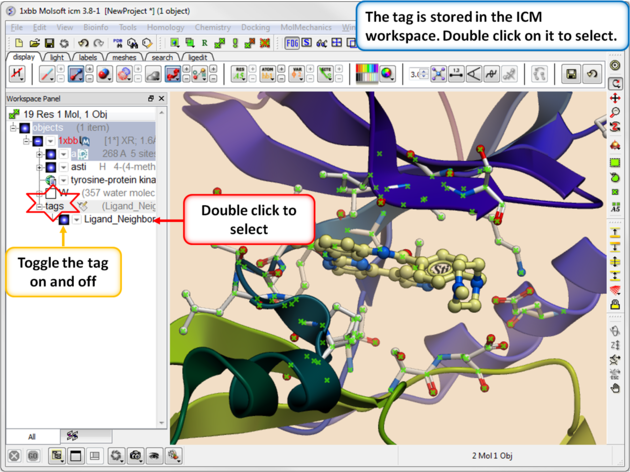 |
| Step 4. You will see the tag in the ICM Workspace. You can toggle the display on or off or select the tag by double clicking on it in the ICM Workspace. |