Google Search: Keyword Search:
| Prev | ICM User's Guide 12.1 Small Molecule Docking | Next |
[ Docking Introduction | Docking Steps | Setup | Adjust Binding Site | Re-make Maps | Docking Preferences | Interaction Restraints | Begin the Docking Simulation | On-screen Demo Dock | Batch Docking | Run Docking Batch | Viewing Your Docking Results | Make a HitList | Hitlist Export | Dock Chemical Table | Reload | Displaying Docking Results ]
| Available in the following product(s): ICM-Pro | ICM-VLS | |
| Additional Resources: Tutorial: Dock Biotin to Streptavidin Receptor | Tutorial: Dock a Ricin Inhibitor | Command Line Docs | Interactive Docking Tutorial Video | Re-dock Tutorial Video |
12.1.1 Docking Introduction |
[ Receptor Considerations | Ligand Considerations | pH | Scoring | Chirality Considerations | Protonation Considerations | Internal Hydrogen Bonds | Ligand Strain ]
This section is concerned with predictions of interactions of drugs or small biological substrates (less than about 600-700 Da) to pockets of larger, more rigid, receptors (typically, protein molecules, DNA or RNA).For accurate ligand docking, the goal is to have an adequate three-dimensional model of the receptor pocket you are planning to dock ligands to. If this is the case then ICM docking has been shown to be very accurate in a number of independent assessments.
However, there are a number of pitfalls which need to be overcome to achieve accurate ligand docking. The pitfalls are that your model is not accurate overall, does not reflect the induced fit, or alternative conformations of the receptor binding pocket are missed.
Some key points about ICM Ligand Docking:
- An average docking time is 0.5 seconds to 30 seconds per ligand per processor. The time per ligand was chosen to be the smallest possible to allow screening of very large data sets. To increase the time spent per ligand, change the Docking_thoroughness parameter. For even faster docking, ideal for libraries more than a billion chemicals see our GPU enhanced methods such as RIDGE, GigaScreen and CombiRIDGE.
- ICM docking is the most accurate predictive tool of the binding geometry today. ICM docking has consistently ranked first place compared to other leading docking software in terms of accuracy. ICM has been successful in many drug design applications by scientists in academia and industry.
- ICM ligand docking procedure performs docking of the fully flexible small-molecule ligand to a known receptor 3D structure.
- The goal of the flexible docking calculation is prediction of correct binding geometry for each binder.
- ICM stochastic global optimization algorithm attempts to find the global minimum of the energy function that includes five grid potentials describing interaction of the flexible ligand with the receptor and internal conformational energy of the ligand.
- During the docking process a stack of alternative low energy conformations is saved.
Please see this link http://www.molsoft.com/docking.html to read more about ICM Docking.
12.1.1.1 Receptor Considerations |
If you have only a single PDB entry for your receptor, convert the protein to an ICM object, delete water molecules and irrelevant chains. However, if you have a choice between several templates, take the following into account:
- X-ray structure is preferable to an NMR structure.
- High resolution X-ray structure ( less than 2.1A ) is much better than, say 2.5A .
- Watch out for high-B-factor regions and avoid them; sometimes crystallographers deposit fantasy coordinates with high-B-factors.
- Check the pocket for correct placement of polar hydrogens and choose correct form of histidine.
- A bound conformation of the receptor is preferable, however if you use an apo-model, an NMR structure or a model by homology, the side-chains in a pocket may be incorrect. Frequently they stick out and prevent a ligand from binding. Those stubborn side-chains can be 'tamed', (i) manually; (ii) by a side chain simulation with elevated surfaceTension; or (iii) using a method such as Dual Alanine Scanning and Refinement ( SCARE).
- A model by homology can be built with the build model command (see molecular modeling section of this manual) and used for docking.
12.1.1.2 Ligand Considerations |
Usually a good place to start is to try to dock the known ligand(s) to the receptor model. You may also want to dock a library of compounds in order to identify lead candidates. In this case the main pitfalls are that the library is too restricted, molecules are not chemically feasible or not drug-like. For peptide docking please use the protein-protein docking protocol.
There is no need to convert the ligands to 3D, this is done "on-the-fly" during the docking process.
| NOTE: If you are docking a ligand directly from the PDB please check the bond types and formal charges of the ligand. This is discussed in the section entitled Converting a Chemical from the PDB |
12.1.1.3 pH Considerations |
pH affects docking via the protonation states. We currently offer automatic protonation of the ligands using built-in pKa model - use chargeGroup setting 'auto' in Docking/Preferences/General. Alternatively a ligand set may be pre-processed using Chemistry/set formal charges at a desired pH.
12.1.1.4 Scoring |
After docking and screening you can make a hitlist of the results which reports the following scores. The goal of scoring in virtual ligand screening is to ensure maximal separation between binders and non-binders , and not to rank a small number of binders according to their binding energies. The scores can be linearly related to binding energy estimates, but the transformation parameters need to be calculated from several reference points (see the Learn and Predict chapter).
- Score. The Score is the ICM VLS Score which is a GBSA/MM-type scoring function augmented with a directional hydrogen bonding term (see Neves et al 2012). A ICM score -of 32 and lower are generally considered good scores - but depends on the receptor (e.g. exposed pockets or pockets with metal ions may have higher scores than -32).
An important parameter of the VLS run is the score threshold. Docked conformation for a particular ligand will only be stored by ICM VLS procedure if its binding-score is below the threshold. The choice of the threshold can be made in two ways: (1) based on the scores calculated by docking known ligands (generally, a value somewhat above typical score observed for known ligands is a good guess); (2) if no ligands are known, a pre-simulation can be run using ~1000 compounds from the target database. Using the resulting statistics for the scores, the threshold should be set to retain ~1% of the ligands. You can edit the Score threshold in the vls-preferences{Docking/Preferences} dialog box or edit the .dtb file.
- RTCNN Score is a Neural Network Score. RTCNN is a Radial Convolutional Neural Net including layers that do Topological (chemical graph) convolutions and 3D Radial convolutions.
The RTCNN score is different from the regular ICM Score (see above) - it does not use any molecular mechanics or physical energy terms. Instead, the score is trained to recognize native-like complexes versus decoys directly, based only on geometries of putative complexes. So, for example, if internally the neural net recognizes a hydrogen bod, it is because it is observed during training that the configurations of atoms that we call hydrogen bonds are present to a greater extend in native-like structures. This is the same for other favorable or unfavourable interactions - it is all learnt from examples, not from any input terms.
The RTCNN score performs extremely well on our benchmarks and the CASF benchmark (Su et al J.Chem.Inf.Model 2019). Please find details about this benchmark here: RTCNN_performance.pdf and read more about RTCNN Score here.
When analyzing a hitlist from virtual screening we would recommend to plot Score vs RTCNN and prioritize those in the quadrant that have low Score and low RTCNN score. One key difference you may observe between RTCNN score and the regular Score is that the RTCNN score has a lower penalty for small induced fit ligand-receptor clashes. The lower the RTCNN score the better the predicted ligand-receptor interaction. - mfScore is the statistical potential of mean force which was derived according to the published methodology (see Muegge J.Med.Chem 2006)
| Note about comparing Neural Network Score (RTCNN) and Physics Based (Score): In a library screening scenario, typically only a very small fraction (<<1%) of compounds are true actives. As a consequence, and due to the inherent noise in scoring, there will be many false positives for any score. They will be almost certainly outnumbering true positives in the VLS hitlist, even though in a less demanding setting of, say, 50/50 or 10/90 active/inactive compound mix the score might have nicely separate them. In this context, the most efficient use of two scoring functions is to look for consensus - because if one score is good but the other one is poor, it is a lot likelier that the molecule is a false positive of the first one, rather than a false negative of the second one. In our evaluations, enrichments that are afforded by the two scores individually are comparable (although depending on the specific target one might perform somewhat better or worse than the other). Therefore, unless there is any data such as scores for known binders, we recommend to apply cutoffs of comparable stringency to both. Lastly, one should also pay some attention to absolute values of scores. Unless screening for low-affinity fragments, compounds with scores weaker than -25. generally are not worth consideration. For most pockets, numbers should really be better than -30. , with large deep pockets often going beyond -40. |
| Note about why Scores may differ between docking runs: It is important to understand that unless there is a single stable binding pose for a given ligand, docking will produce a variety of poses. This is consistent with physics - only reasonably high-affinity ligands in reality would stay bound in a single configuration, poor binders will drift around through a variety of weakly-bound configurations. One should look first at the pose convergence and only after convergence is achieved one would look at score convergence. When there isn't a strong single most favorable pose, top docked pose may vary from run to run. Many poses may need to be re-scored to get consistent best-scoring poses because one or even three poses may not be enough to always include top-scoring pose according to VLS score. |
12.1.1.5 Chirality Considerations |
To sample linear chiral centers during docking you can check the option "Sample Racemic Centers" in Docking/Preferences/General. To sample chiral centers in rings it is best to generate all 2D enantiomers using Chemistry/Generate Stereoisomers. For most linear cases 'sample racemic centers' is acceptable. For most rigorous treatment one should pre-generate all stereoisomers (Chemistry/Generate Stereoisomers). If you do not select anything you get one (essentially arbitrary) stereoisomer docked.
12.1.1.6 Protonation Consideration |
The protonation state can be set in the Docking/Preferences/General dialog box. Choose the drop down option in the field labeled Charge Groups. This option charges some ionizable basic groups, it currently accepts the following values: space-separated NH2, NH, NT for primary secondary and tertiary aliphatic amines. There are also options for imidazole and amidine. An alternative is auto, which uses built-in prediction of Ka/Kb to charge and protonate/deprotonate appropriate groups. The none option still charges acids unless neutralAcids flag is set to no in the docking table file .dtb or .tab.
To determine protonation at a range of pH values you can use the options in Chemistry/Set Formal Charges/ and choose the option Auto using Pka Model.
12.1.1.7 Internal Hydrogen Bonds |
Internal hydrogen bonds are taken into account during docking by default. You can check in the docking_project_name.dtb table file to make sure that l_internalHB field is 'yes'.
12.1.1.8 Ligand Strain |
Docking using ICM-Pro + VLS reports global strain of the ligand in the hitlist (see Eintl). The lower the Eintl value is the lower the strain - we suggest cutoff between 5 and 10, depending on how strict or permissive you want to be. More permissive settings may be justified by the noise in strain evaluation and lack of full receptor relaxation (induced fit would potentially let the ligand relax further). Also larger ligands may generally give larger strains. This value represents the energy difference between the relaxed (unbound) ligand and its conformation in the docked (bound) state - so lower values are better. It also contributes to the physics-based docking score (the ‘Score’ value).
To calculate this, an ensemble of low-energy ligand conformers is generated in solution using the MMFF94s force field. The lowest-energy conformer is used as the unstrained reference. Strain is then defined as the energy difference between this reference conformation and the docked pose, with both energies computed using the same force field.
Analysis of specific torsion can be performed via torsion profile calculation at force-field level with MolMechanics/Torsion Scan, or via Crystallography Open Database search with appropriate substructure (Search Tab, select COD search, draw substructure) and statistics calculation with Chemistry/Torsion analysis.
12.1.2 Docking Steps |
The key docking steps are:
- Setup the Docking Project.
- Check Docking Preferences.
- Choose Ligand or Database and Start Docking Simulation
- View Docking Results
12.1.3 Docking Project Setup |
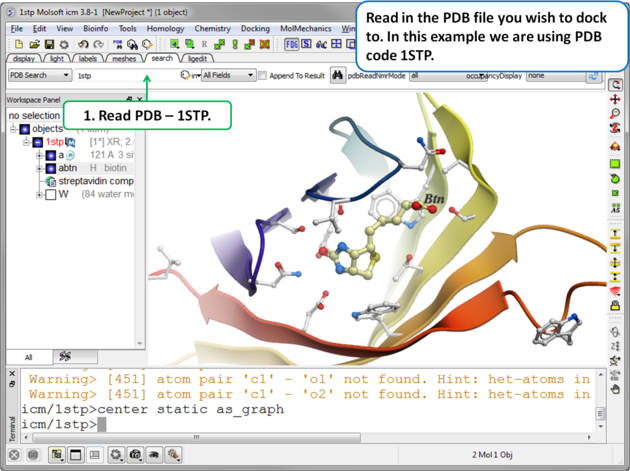 |
| Step 1. Read in the PDB file. In this example we will re-dock the biotin to streptavidin using PDB code 1STP. |
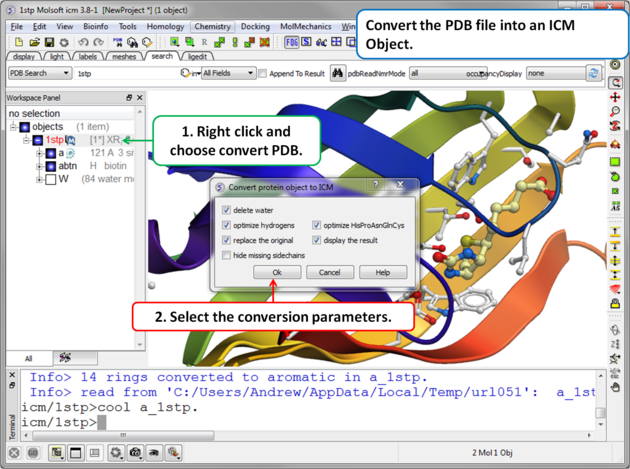 |
Step 2. Convert PDB
|
 |
| Step 3 Move the Ligand out of the Pocket IMPORTANT! If you are redocking a ligand please remember to remove the ligand from the ligand binding pocket otherwise the ligand will be included in the docking maps and you will not be able to re-dock it correctly. To remove a ligand from an object - right click on the ligand in the ICM Workspace and select "move from object". Simply undisplaying the ligand is NOT sufficient. |
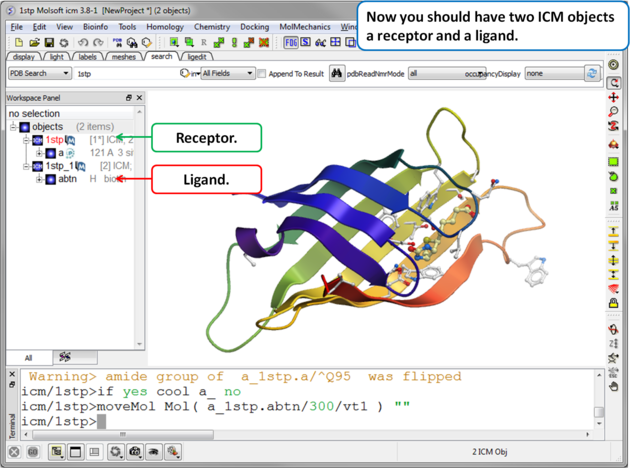 |
| Step 4. Check the Ligand. You should have two objects in the ICM Workspace - the receptor (e.g. 1stp) and the ligand (1stp_1). For clarity you can rename them by right clicking on the name in the ICM workspace and choose rename. This is a good opportunity to double check that the bond types and formal charge of the ligand are correct. You can edit them as described here. |
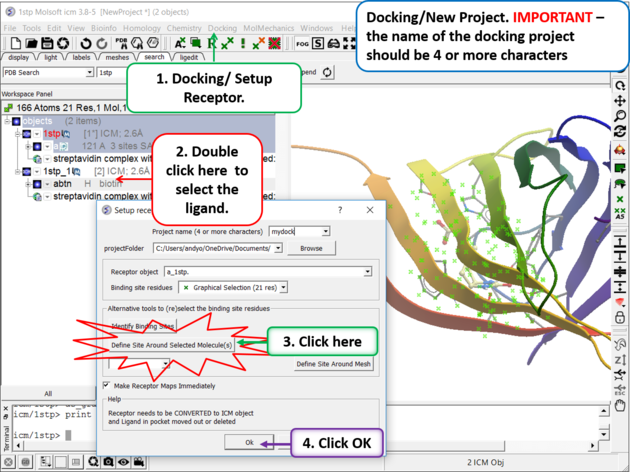 | |
Step 5. Docking/Setup Receptor
|
- Choose the option Make receptor maps immediately. You can uncheck this if you are going to do 4D or covalent docking because the maps are re-made with these options.
- Enhanced Born Scoring option is available. Enhanced Born Scoring precalculates Born radii using a Poisson-Boltzmann calculation based on a set of baseline radii. Born radii reflect how exposed each atom is to solvent, and they are used in implicit solvation models to estimate electrostatic solvation energy. The Poisson-Boltzmann equation provides a more accurate way to calculate electrostatics in a solvated environment, and this method refines initial (baseline) estimates of atomic exposure to improve accuracy. This can be especially helpful in electrostatic calculations for highly polar or deeply buried binding pockets. The main time cost occurs during the generation of the energy maps and setting up the receptor, but this does not affect the actual docking or virtual screening time.
- Click on the OK button.
| NOTE: At this stage of the docking setup it is a good idea to keep an eye on the terminal window. Instructions and any error messages will be displayed in the terminal window. If you do not see the terminal window select Windows/Terminal Window. |
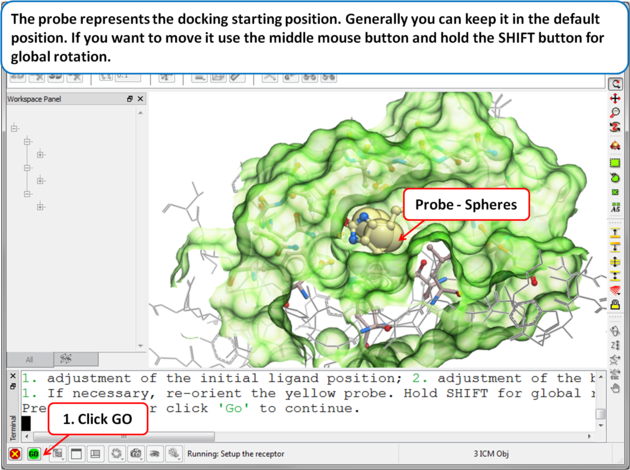 | |
| Step 6: Adjusting the Position of the Probe
The position of the probe (usually represented as 4 spheres in the center of the pocket) represents the initial position where sampling will begin. The default probe position is generally OK for most purposes but if you would like to move it to a critical part of the receptor so that sampling initially concentrates in that region you can do so using the middle mouse button and holding the SHIFT button for global rotation. Once you are happy with the position of the box press the enter key or click on "GO".
|
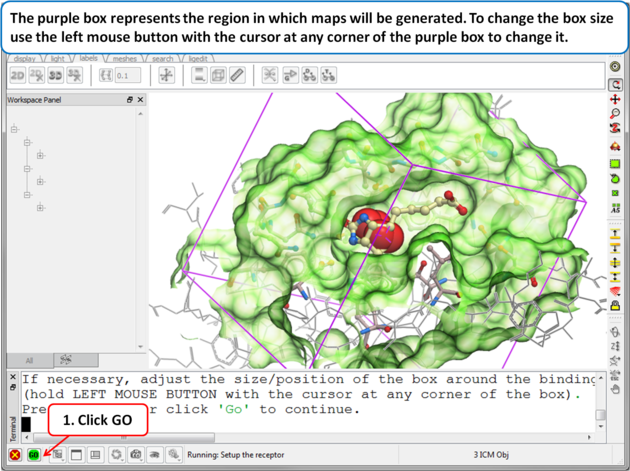 | |
| Step 7: Adjusting the Size of the Box
The purple box represents the region in which maps will be generated. The box needs to be large enough to encompass the binding pocket but not too large and including regions of the receptor which are not relevant for the ligand to bind. If the binding site is correctly defined in the earlier Receptor setup then the default box size is usually fine. If it is necessary to change the box size you can use the left mouse button with the cursor at any corner of the purple box to change it.
|
12.1.4 Review and Adjust Binding Site |
If at any point you want to change the binding site use the option Docking/Review Adjust Ligand/Box... Here you can change the initial position of the probe (default center or box) and the size of the box. If you change the size of the box you need to re-make the maps using the option Docking/(Re) Make Receptor Maps. You can use this option to also change the default map parameters such as the grid cell size and map weighting by occupancy.
12.1.5 (Re) Make Receptor Maps |
If you change the size of the binding site box you will need to re-make the maps. To do this:
- Docking/(Re) Make Receptor Maps
12.1.6 Check Docking Preferences |
[ General Preferences | Database Scan Preferences | Display Preferences ]
The docking preferences options can be found here Docking/Preferences.
12.1.6.1 General Preferences |
Docking/Preferences/General
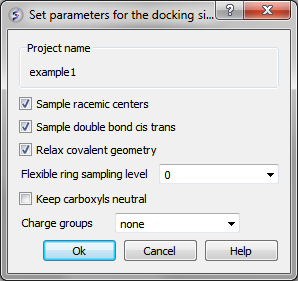
You can choose to:
- Sample racemic centers.
- Sample double bonds as cis trans.
- Relax covalent bond geometry (set as yes by default).
- Flexible ring sampling level. This option can be used for macrocycles. If the value is set to "1" then the ring is only flexible in pre-sampling. If the value is set to "2" then the ring is flexible throughout the simulation.
- Keep carboxyls neutral (set as no by default).
- Charge groups: provides simple interface to charge some ionizable basic groups, it currently understands following values: NH2, NH , NT for primary secondary and tertiary aliphatic amines, also it understands 'imidazole' and 'amidine'. If you have charged your ligands in a separate software you can use the option 'none' if not it is recommended to use the option 'auto', which uses built-in prediction of Ka/Kb to charge and protonate/deprotonate appropriate groups.
12.1.6.2 Database Scan Preferences |
Docking/Prefences/Database Scan
These options are required when undertaking large scale docking and scoring using Virtual Ligand Screening (VLS). They are described in the VLS chapter of this manual.
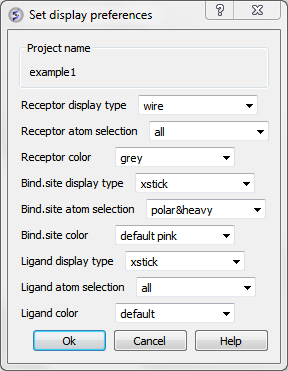
12.1.6.3 Display Preferences |
A number of docking display options can be changed in Docking/Preferences/Display
Now begin the docking procedure.
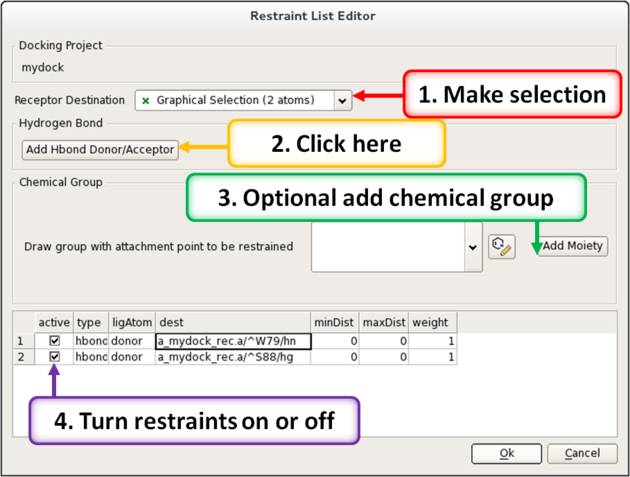
12.1.7 Interaction Restraints |
To restrain the docking to a particular hydrogen bond donor or acceptor in the receptor.
- Docking/Interaction Restraints.
- Select the atoms in the docking project receptor (e.g. _rec object) that you would like the ligand(s) to interact with and click on the "Add Hbond Donor/Acceptor button.
Or you can restrain by a defined moiety in the ligand with the receptor atom.
- Docking/Interaction Restraints.
- Select the atoms in the docking project receptor that you would like the ligand(s) to interact with.
- You can also define a chemical moiety that you would like to interact with the receptor. To do this click add the SMILES string or click on the button to sketch the chemical group. An attachment point needs to be defined (right click on atom and choose Attachment Point from the menu).
- A table of the restraints will be displayed. You can check the restraint on and off using the check marks in the "Active" column. You can also increase the weight.
|
Notes Q: How do distance constraints work in docking or modeling - are they hard filters? A: No, constraints are not hard filters. They act as harmonic force potentials: when atoms are within the defined range, no force is applied. If the distance exceeds the range, a restoring force is applied that increases with deviation. Q: How do I control the strength or tightness of a constraint? A: Use the weight parameter. A higher weight applies a stronger force when the constraint is violated, effectively making the constraint tighter. Q: With a hydrogen bond acceptor restraint, do I need to enter the minDist and maxDist values in the restraints table? A: No. The distance parameters for hydrogen bond restraints are internally preset, so you do not need to manually define minDist and maxDist in the table. Q: If I specify three active hydrogen bond acceptor restraints, will docking always find a pose that satisfies all three? A: Not necessarily. While the docking algorithm will attempt to satisfy all active restraints, success depends on whether the ligand has enough appropriately positioned hydrogen bond donors to interact with all three acceptors. If the geometry doesn't allow it, or if sampling is limited, one or more restraints may not be satisfied. |
12.1.8 Begin the Docking Simulation |
Once the receptor and maps have been correctly set up then the docking procedure can begin.
There are three possible options to choose when On-screen Demo Dock, BATCH, or Dock Chemical Table docking (Please note some of the options may be limited for users without ICM-VLS)
- On-screen Demo Dock is ideal when you have a single ligand and simply want to re-dock it to the receptor. For anything more advanced, such as multiple ligands or larger workflows, use Batch Docking or Dock Chemical Table (see below). It can also be used to view the ligand docking to the pocket which is useful for teaching or demonstration purposes. In ICM versions 3.8-5 and older this option was called Interactive Docking.
- BATCH docking will run in the background and is an ideal choice for screening a database of compounds e.g. vls.
- Dock Chemical Table will allows you to easily dock a chemical spreadsheet that is loaded into ICM.
12.1.9 On-screen Demo Dock |
[ On-screen Demo Dock: Mol Table Ligand | On-screen Demo Dock: Loaded Ligand ]
Use On-screen Demo Dock docking to dock one ligand at a time in the foreground. It is ideal to use this option for small-scale docking and to view the flexible ligand sampling the pocket.
- Click on the menu Docking/On-screen Demo Dock
Choose either Mol Table Ligand or Loaded Ligand
12.1.9.1 On-screen Demo Dock: Mol Table Ligand |
If you have a chemical table already loaded into ICM you can use this option to dock chemicals in it. You can read mol/mol2 or sdf files into ICM by using File/Open. They will be displayed in a table.
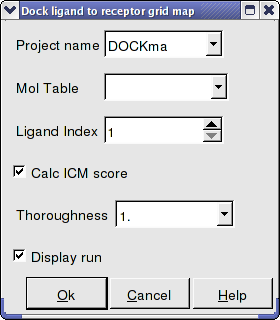
- Enter the Docking Project Name
- Use the drop down arrow to find the table of ligands you wish to dock.
- Enter the number of the ligand in the table you wish to dock. For example, if the ligand is in row 6 enter 6.
- If you have ICM-VLS you can retrieve an ICM docking score for the docked ligand.
- 'Effort' or thoroughness represents the length of the simulation. Generally 1 is a reasonable value for buried hydrophobic pockets. If you are docking to solvent exposed pockets or pockets containing metal ions you may wish to increase this parameter.
- Display run will display the ligand sampling the energy in the ligand binding pocket. Although this is fun to watch this significantly slows down the docking operation.
12.1.9.2 On-screen Demo Dock: Loaded Ligand |
If you have a ligand as an ICM object you can use this option.
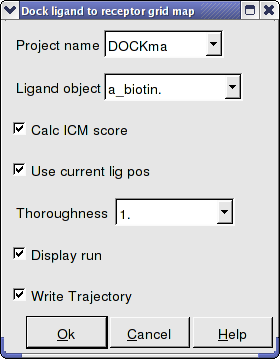
- Enter the Docking Project Name
- Use the drop down arrow to find the ligand.
- If you have ICM-VLS you can retrieve an ICM docking score for the docked ligand.
- If the ligand is already located in the pocket you can use this option. However by default the ligand will start sampling in the center of the pocket so this option does not need to be used.
- Thoroughness represents the length of the simulation. Generally 1 is a reasonable value for buried hydrophobic pockets. If you are docking to solvent exposed pockets or pockets containing metal ions you may wish to increase this slightly.
- Display run will display the ligand sampling the energy in the ligand binding pocket. Although this is fun to watch this significantly slows down the docking operation.
- You can write the docking simulation to a trajectory file. Please see the command language manual for more information on this.
12.1.10 Batch Docking |
[ From Loaded ICM Object | From File | From Mol/Mol2 | From Indexed Database | From MolCart Database ]
Batch Docking is used for running docking jobs in the background. It is ideal for large-scale docking jobs.
- Use the menu option Docking/Batch Ligand Setup to setup the docking run
- Once setup use the menu option Docking/Run Docking Batch to run the batch docking.
12.1.10.1 Batch Docking: From Loaded ICM Object |
From Loaded ICM Object Your ligand needs to be an ICM object and loaded into ICM (File/Open). Your object will be displayed in the ICM Workspace.
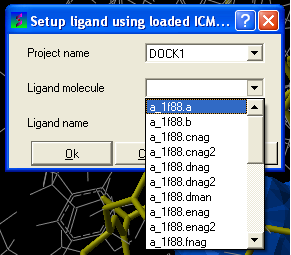
- Enter the name of the docking project.
- Ligand Molecule Use the drop down button to find the loaded ligand or enter the ICM selection language.
- Ligand Name A docked ligand will be given a name. Change this if you wish or use the default name.
- Once setup use the menu option Docking/Run Docking Batch to run the batch docking.
12.1.10.2 Batch Docking: From File |
From File: ICM If your ligand (s) is saved and converted to an ICM object but is not loaded into ICM then you can use this option.
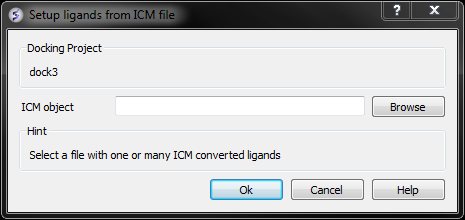
- Browse for the ICM Object.
- Click OK
12.1.10.3 Batch Docking: From Mol/Mol2 |
From File:MOL/MOL2
If your ligand is a MOL or MOL2 file then
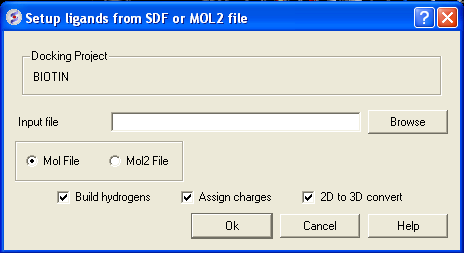
- Browse for your MOL/MOL2 file.
- Select whether your ligand is in MOL or MOL2 format.
- If you wish hydrogens to be added to your compound or charges to be assigned then click on the appropriate boxes in the display panel.
- Click OK
12.1.10.4 Batch Docking: From Indexed Database |
From Indexed Database - only available with ICM-VLS
In most cases the ligand input file will be an SDF or MOL2 file. These files need to be indexed by ICM before they can be used in VLS runs (see next section of this manual). The index is used to allow fast access to an arbitrary molecular record in a large file such as an SDF file which in some cases contains over one million compounds.
To index an sdf file:
- Click on the menu Docking/Tools/Index Mol/Mol2 File/Database to generate the index. The following data entry box will be displayed.

- Enter the name of your Mol/Mol2 file and enter the name you wish to call your index file.
- Select whether your file is in Mol or Mol2 format.
- Browse for your Index file.
- Select whether your ligand is in MOL or MOL2 format.
- If you wish hydrogens to be added to your compound or charges to be assigned then click on the appropriate boxes in the display panel.
- Click OK
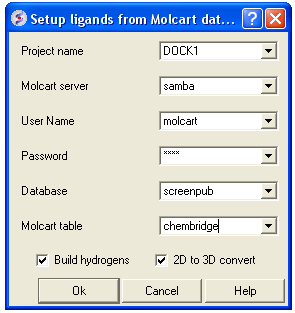
12.1.10.5 Batch Docking: From MolCart Database |
From MolCart - only available with ICM-VLS
| NOTE A separate license is required for MolCart |
- Enter docking project name.
- Enter the MolCart server
- Enter your username
- Enter Password
- Enter the Database Name
- Enter the name of the MolCart table within the Database
- Select whether you would like to build hydrogens or convert the compounds from 2D to 3D.
12.1.11 Run Docking Batch |
IMPORTANT Once you have setup the docking you need to set it running using the menu option Docking/Run Docking Batch

- Docking/ Run Docking Batch
- Enter the Docking Project Name
- Batch docking will generate an output file - enter the name you wish to call this file here.
- Thoroughness represents the length of the simulation. Generally 1 is a reasonable value for buried hydrophobic pockets. If you are docking to solvent exposed pockets or pockets containing metal ions you may wish to increase this slightly.
- Selecting Store Alternative Conf will allow you to look at all conformations in the energy stack.
- Score All Stack Conf. will allow you to determine an ICM docking Score for all members of the stack - this will slow the docking down.
- License type: For nearly all license (e.g. standard ICM-VLS licenses) types you need to leave this entry blank. If you have a -vlscluster license or a molvls license (-vls) then select the option from the drop down list. Any questions first check your license.dat file or Email support@molsoft.com.
- Click OK IMPORTANT - IF THE JOB IS RUNNING IT WILL TELL YOU bgrnd job AT THE TOP OF THE GUI - SEE BELOW
Docking simulation is running
![]()
Docking simulation has ended message
To check the status of your docking simulation
- Windows/Background Jobs
12.1.12 Viewing Your Docking Results |
[ Scan Hits | View Stack Conformations ]
Docking results can be visualized and browsed in one of the following ways.
- Docking/Browse/Scan Hits - If you have docked a multi-ligand file (eg SDF) or if you want to go back and see a single docked structure you can scan the structures using this option.
- Docking/Browse/Stack Conformation - View other possible conformations for the docked ligand ranked by energy.
- Docking/Make Hit List - Rank docked compounds by ICM Docking Score Only available with ICM-VLS
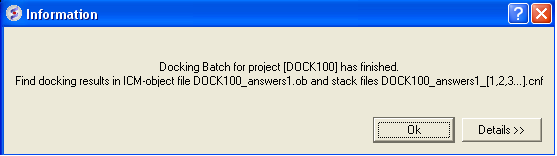
The results of the docking are saved in the following files
PROJECTNAME_LIGANDNAME.ob #icm-object file with best solutions for each ligand
PROJECTNAME_*.cnf         #icm conformational stack files with multiple docked conf.
The results of the docking job using ICM-VLS (separate license required) are saved in the following files:
PROJECTNAME_answers*a.ob  #icm-object file with best solutions for each ligand
PROJECTNAME_*.cnf        # icm conformational stack files with multiple docked conf.
PROJECTNAME_*.ou         # output file where various messages are stored eg.SCORE
12.1.12.1 Docking Results - Scan Hits |
- Select Docking/Browse/Scan Hits and a data entry box as shown below will be displayed.
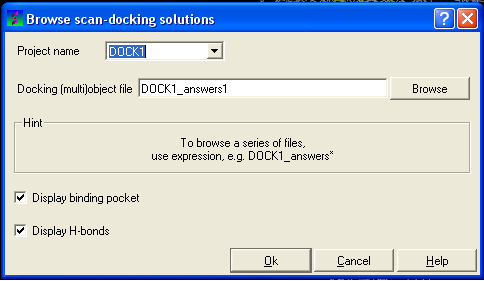
- Select the correct project name for the docking simulation results you wish to browse.
- Enter the name of the icm object file in the Docking (multi)object data entry field. This file will be called PROJECTNAME_answers*.ob or LIGAND_NAME.ob The browse button can be used to search for the correct file.
- You can display the binding pocket or the H-bonds by selecting the appropriate boxes in the Browse scan-solutions data entry window (shown above).
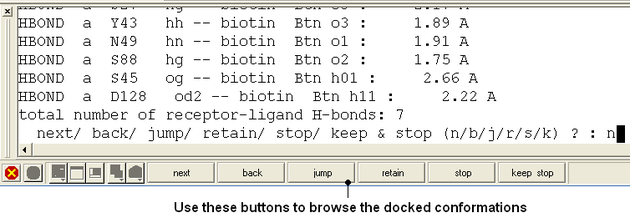
- Use the buttons at the bottom of the graphical user interface to browse the docked conformations. NEXT(or type "n"), BACK (or type "b"), JUMP (or type "j"), RETAIN (or type "r"), STOP (or type "s"), KEEP_STOP (or type "k").
- The options keep and stop and retain will retain the displayed ligand in the graphical user interface. If you want to export the docked complex as a PDB file you will need to move the ligand and receptor into one ICM object. Moving objects is described in the FAQ section entitled How can I merge two objects into one?
12.1.12.2 Docking Results - View Stack Conformations |
To view the multiple positions of a single ligand in the docking simulation ranked by energy.
- Select menu Docking/Browse/Stack Conformations
The Browse Stack Conformation data entry window will be displayed.
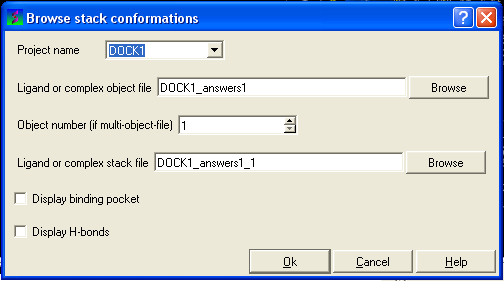
- Select the correct project name for the docking simulation results you wish to browse.
- Enter the name of the icm object file in the Docking (multi)object data entry field. This file will be called PROJECTNAME_answers*.ob .The browse button can be used to search for the correct file.
- Enter the name of the icm conformational stack files with multiple docked conformations into the Ligand or complex stack file data entry box. This file will be called PROJECTNAME1_1.cnf . The browse button can be used to search for the correct file. The second solution in the stack can be viewed by changing the number 1 at the end of the file name to 2 (PROJECTNAME1_2.cnf) and so on for each solution in the stack.
- You can display the binding pocket or the H-bonds by selecting the appropriate boxes in the Browse scan-solutions data entry window (shown above).
- Use the buttons at the bottom of the graphical user interface to browse the docked conformations. NEXT(or type "n"), BACK (or type "b"), JUMP (or type "j"), RETAIN (or type "r"), STOP (or type "s"), KEEP_STOP (or type "k").
- The options keep and stop and retain will retain the displayed ligand in the graphical user interface. If you want to export the docked complex as a PDB file you will need to move the ligand and receptor into one ICM object. Moving objects is described in the FAQ section entitled How can I merge two objects into one?
Columns in the Stack Table
i rank in stack
ener Energy kcal/mol
gvw van der Waals grid potential
gb hydrogen bonding grid potential
ge electrostatic grid potential
gs hydrophobic grid potential
Einternal is internal conformation energy of the ligand. This value represents the energy difference between the relaxed (unbound) ligand and its conformation in the docked (bound) state - so lower values are better. It also contributes to the physics-based docking score (the ‘Score’ value).
To calculate this, an ensemble of low-energy ligand conformers is generated in solution using the MMFF94s force field. The lowest-energy conformer is used as the unstrained reference. Strain is then defined as the energy difference between this reference conformation and the docked pose, with both energies computed using the same force field.
12.1.13 Make a Hitlist |
[ Hitlist Columns ]
A hilist is a convenient way to view your docking results in a chemical spreadsheet. To make a hitlist
- Docking/Make Hit List
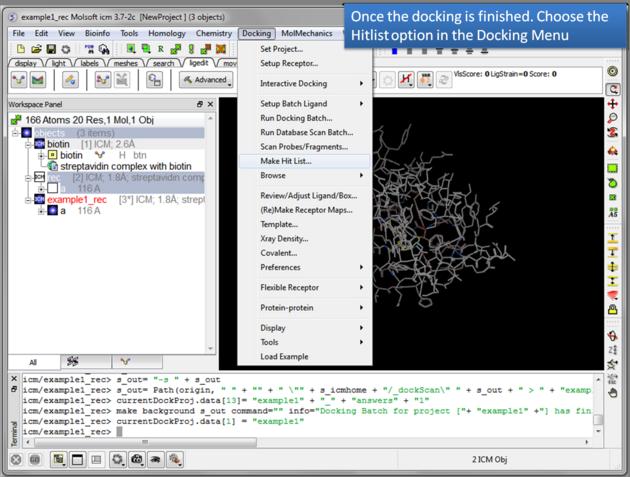
- Enter project name
- Use the browse button to locate DockingProjectName_answers.ob file
- You can include a 2D image into the HITLIST
- Select Unique if you have made multiple docking runs the best docking score will be taken to make the hitlist unique.
- A HITLIST table will be displayed. Each docked ligand can be viewed by double clicking in the HITLIST table. A stack of conformations for each ligand will also be displayed in a table.

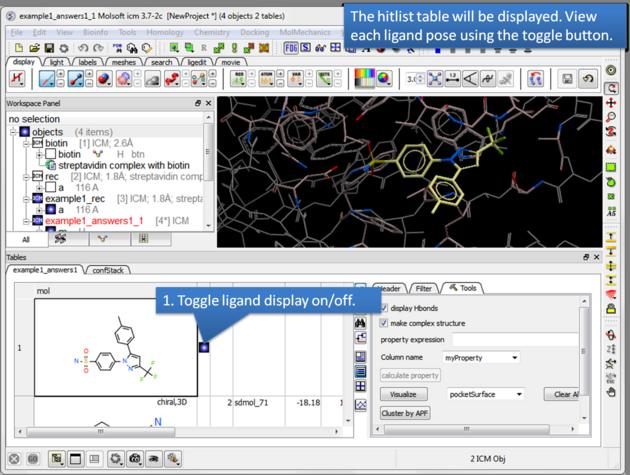
There is a toggle button to easily undisplay or display each ligand pose.
12.1.13.1 Guide to the Hitlist Columns |
Columns in the HitList Table with ICM-VLS LICENSE
- IX is the index number from the docked database
- Score is the ICM score -32 and lower are generally considered good scores - but depends on the receptor (e.g. exposed pockets or pockets with metal ions mayhave higher scores than -32) ( More... ).
- Natom is the number of atoms in docked ligand
- Nflex is the number of rotatable torsions
- Hbond is Hydrogen Bond energy - (lower the better)
- Hphob is the hydrophobic energy in exposing a surface to water (lower the better)
- VwInt is the van der Waals interaction energy (sum of gc and gh van der waals). Current version of the score uses explicit van der Waals interaction energy calculation (no grids). (lower the better)
- Eintl is internal conformation energy of the ligand. (lower the better). We suggest cutoff between 5 and 10, depending on how strict or permissive you want to be. More permissive settings may be justified by the noise in strain evaluation and lack of full receptor relaxation (induced fit would potentially let the ligand relax further). Also larger ligands may generally give larger strains. Eint is a component of the Score - default weight is 0.6. This value represents the energy difference between the relaxed (unbound) ligand and its conformation in the docked (bound) state - so lower values are better. It also contributes to the physics-based docking score (the Score value). To calculate this, an ensemble of low-energy ligand conformers is generated in solution using the MMFF94s force field. The lowest-energy conformer is used as the unstrained reference. Strain is then defined as the energy difference between this reference conformation and the docked pose, with both energies computed using the same force field.
- Dsolv is the desolvation of exposed h-bond donors and acceptors (lower the better)
- SolEl is the solvation electrostatics energy change upon binding (lower the better)
- dTSc Loss of entropy by the rotatable protein side-chains.
- mfScore is the potential of mean force score.
- RTCNN Score is a Neural Network Score - the lower the score the better the predicted interaction. ( More... )
- RecConf - if multiple receptor conformations was used Docking/Flexible Receptor/Setup 4D grid and represents the receptor conformation number
Columns in the HitList Table with ICM-PRO ONLY - NO ICM-VLS LICENSE
- Edoc = grid docking energy - the lower the better. It is the sum of the interaction terms reported below, plus internal energy of the ligand (~strain). Units are kcal/mol, this is am energy model intended primarily to rank well the near-native poses.
- Egb = hydrogen bond grid energy http://www.molsoft.com/man/terms.html#term-gb
- Ege = electrostatic grid potential http://www.molsoft.com/man/terms.html#term-ge
- Egs = hydrophobic potential http://www.molsoft.com/man/terms.html#term-gs
- Egv = is grid-based van der Waals (ia sum of .gh' http://www.molsoft.com/man/terms.html#term-gh and .gc' http://www.molsoft.com/man/terms.html#term-gc )
| NOTE There are a number of post-screening analysis built into the Tools panel on the right hand side of the hitlist. These are described here. |
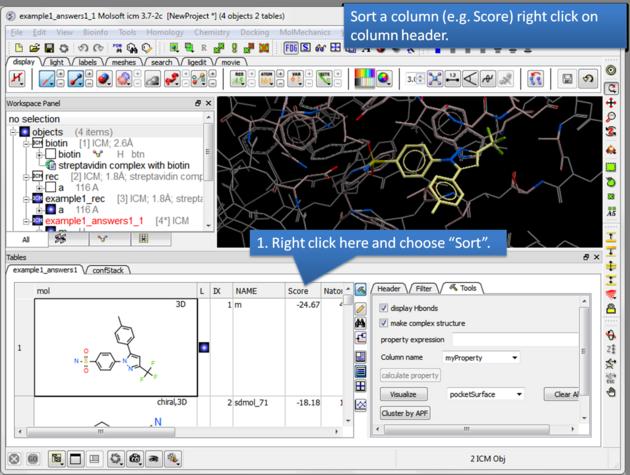 |
| How to sort the hitlist. Right click on a column header and select "Sort". For example you may want to sort by docking score. |
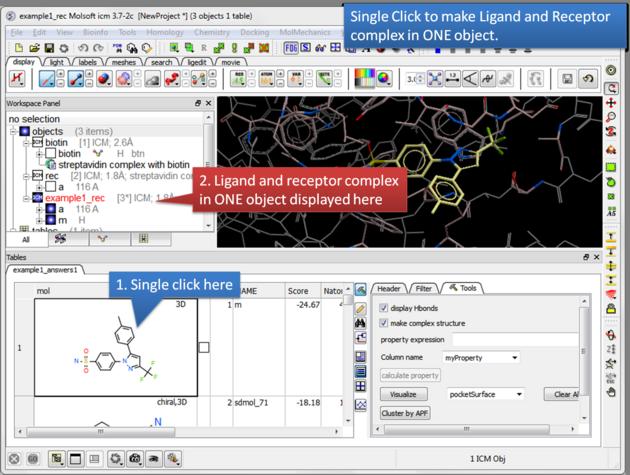 |
| Single click. A single click on a row in the hitlist will load the ligand and receptor complex in one object. |
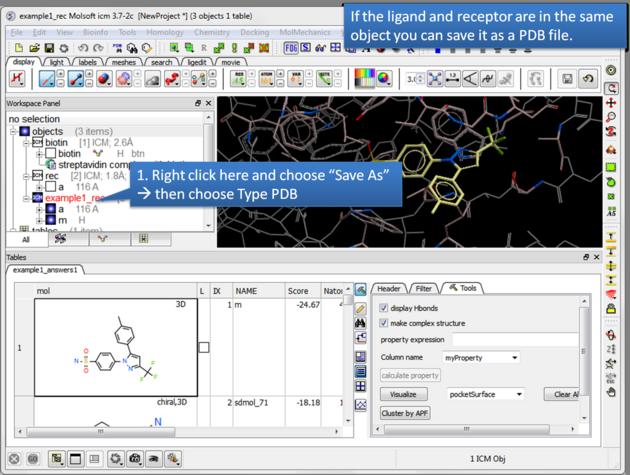 |
| Save a complex as a PDB file. If the ligand and receptor are in the same object you can save them both as a PDB file. Right click on the name of the complex in the ICM Workspace. Select "Save as" and then a Windows dialog window will be displayed. Use the drop down button to select Type PDB (.pdb .ent). |
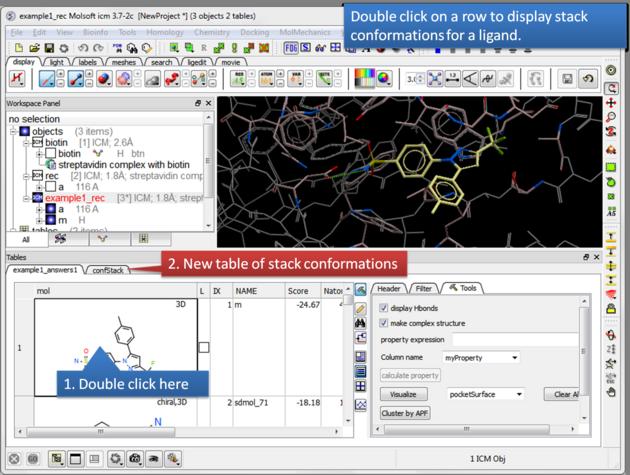 |
| Display stack of alternative ligand conformations. Double click on a row generates a new stack conformation table. |
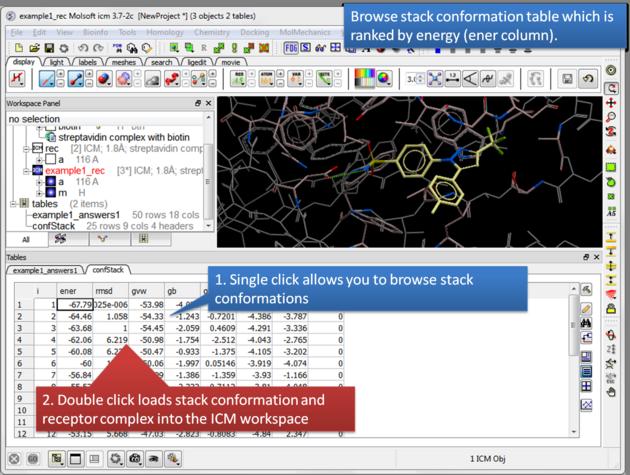 |
| Browse stack conformations. Single click allows you to browse (or use up/down arrow keys) and double click generates complex in the ICM workspace. |
 |
| Display stack of alternative ligand conformations. Double click on a row generates a new stack conformation table. |
12.1.14 Hitlist Export |
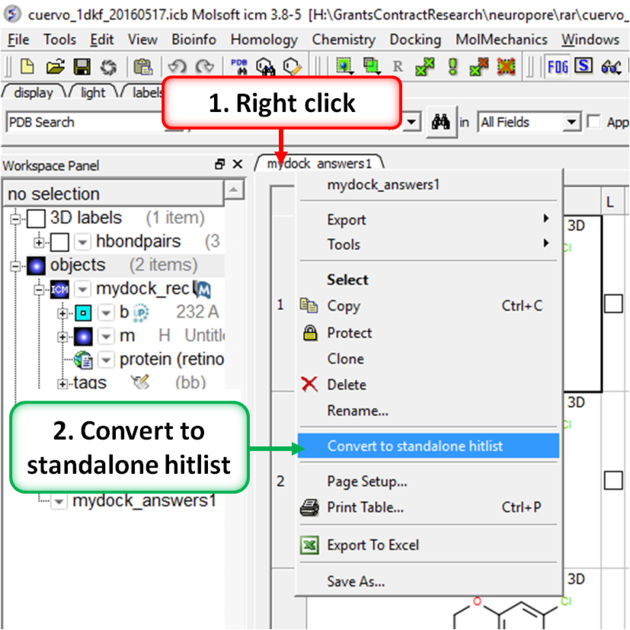
A docking hitlist can be made into a standalone docking project file to share with others and open in locations away from the docking directory. This can be done by:
- Make the docking hitlist Docking/Make Hitlist.
- Right click on the hitlist header tab (see image below).
- Select Convert To Standalone Hitlist
- File/ Save Project and save the project as an .icb file that others can view using ICM or the free ICM-Browser.
12.1.15 Dock Chemical Table |
To dock directly from a chemical table:
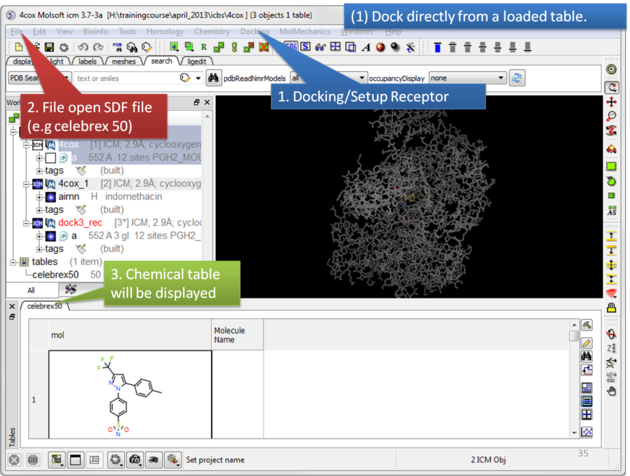 |
| Setup the receptor and read in the chemical table. |
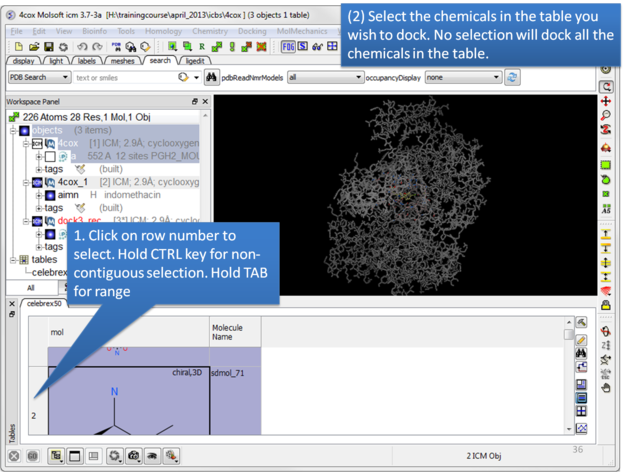 |
| Select the chemicals in the table you wish to dock. If no selection is made ICM will dock the whole table. You can make selections by clicking on the row numbers whilst holding CTRL (non-contiguous selection) or TAB (contiguous selection). |
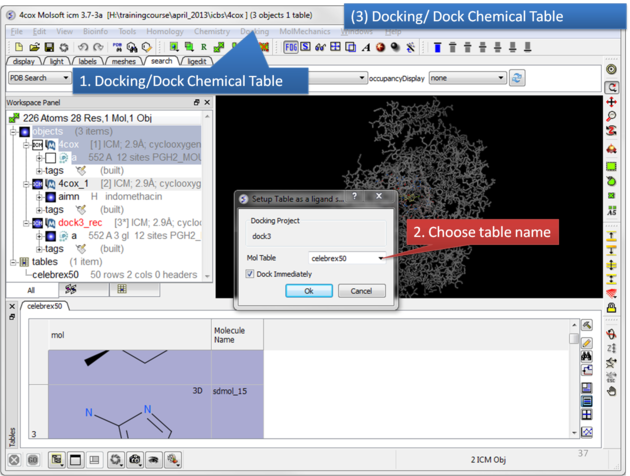 |
| Click on the Docking menu and select Dock Chemical Table. |
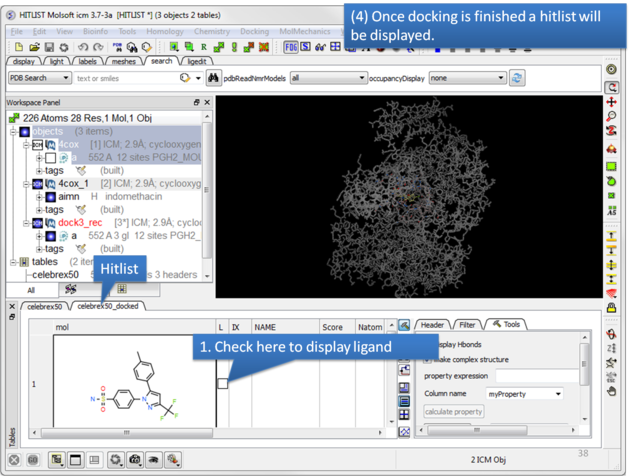 |
| Once the docking has finished a hitlist will be displayed. |
| NOTE: If you want to run the docking again you need to uncheck the boxes in the 'docked' column in your original docking table. To uncheck all - right click on the 'docked' column header and choose 'uncheck'. |
12.1.16 Reload a Docking Project |
To reload a docking project in version 3.7-2 and earlier.
/Docking/Set Project - Type in the Docking Project Name (Case Sensitive)
or in versions above 3.7-2
/Docking/Open Project
Now you can browse scan solutions etc.... and use the maps to dock another ligand.
12.1.17 Displaying Docked Ligand-Receptor Complex |
After docking you will make a hitlist and in the hitlist table there some options to help to display the ligand-receptor complex. These options are in the extra panel section of the hitlist table. Here is how to access them:
- Single click on one row of your hitlist to load the ligand (usually labeled m) into the receptor object (_rec object).
- Click on the Extra panel button on the hitlist.
- Select the Tools tab.
- Go to the Visualizations section and use the drop down button to choose "Pretty View".
- Click on the Visualizations option and the complex will be displayed in "Pretty View".

The same panel can be used to display:
- Pocket Surface a mesh representation of the ligand binding pocket colored by properties of the ligand (opposite of pocket skin below). White=aromatic lipophilic, Green=non-aromatic other (mostly aliphatic) lipophilic surface, Red=hydrogen bonding acceptor potential, Blue=hydrogen bond donor potential.
- Pocket Skin - a surface colored by the binding properties of the pocket. White=aromatic lipophilic, Green=non-aromatic other (mostly aliphatic) lipophilic surface, Red=hydrogen bonding acceptor potential, Blue=hydrogen bond donor potential.
- Atom Energies - contribution of each atom to the Docking Score.
- Clash Volumes - highlights any clashes between ligand and receptor.
| Note There are additional display preferences you can set using Docking/Preferences/Display. |
| Prev Docking | Home Up | Next Flexible Docking |