[ File Menu | Edit Menu | View Menu | Bioinfo Menu | Tools Menu - Xray | Tools Menu - 3D Predict | Tools Menu - Analysis | Tools Menu - Superimpose | Tools Menu - Extras | Tools-Menu Table | Tools Menu - Chemical Search | Tools Menu - Molecular Editor | Homology Menu | Chemistry Menu | Docking Menu | MolMechanics Menu | Windows Menu ]
| Note: Click Next (top right hand corner) to navigate through this chapter. Headings are listed on the left hand side (web version) or by clicking the Contents button on the left-hand-side of the help window in the graphical user interface. |
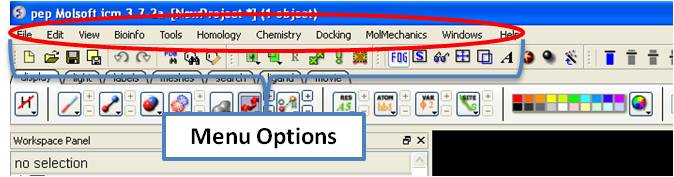
Here we describe all the options in the drop down graphical user interface menus.
[ New | New ICM Session | Open | Open with Password | Extract from ICB | Convert to Local Database | Load | Save Project | Save Project As | Save Compatible | Password | ActiveICM HTML | Close | Quick Image | Write Image | Preferences | Recent Files | Recent PDB Codes | Quit ]
This option allows you to create new peptides, dna, sequences etc... and is described in the Create New Objects chapter.
File/New ICM Session
This option allows you to generate a new clear ICM session or clone the current one.
File/Open
This option is described in the Open and Read chapter.
File/Open with Password
This option is described in the Open and Read chapter.
File/Extract from ICB
This option is described in the Open and Read chapter.
Please see the Local Databases chapter for more information about this option.
Options contained within the menu File/Load
PDB - read PDB from FTP, http, and local PDB
From Multiple Object File - A multiple object file will have a file extension *.ob and you can select which member of the multiple object is displayed.
PFam Alignment - PFam is a collection of multiple sequence alignments - enter FASTA ID
SwissProt - Download SwissProt sequence.
All Images from Dir - Read into ICM multiple image files png or jpg.
Electron Density Map - Download electron density map from Uppsala electron density server http://eds.bmc.uu.se/eds/
3D Mesh in KMZ or COLLADA Format from Google - see http://sketchup.google.com/3dwarehouse/ to download KMZ or COLLADA.
This is described in the Save File chapter.
This is described in the Save File chapter.
File/Save Project Compatible with ICM 3_5
Use this option to save a version of your ICM project compatible with an older version of ICM. Version 3.5 or older. If you have an ICM license you can update your version of ICM by visiting our support site at www.molsoft.com/support
To save a project which is protected by a password:
- File/Save with Password
- Enter a file name or browse for a previously saved project.
- Enter a password
- Determine whether you want the file to be Fully Protected, read only or Read Only and Allow Comments .
To embed in a web browser.
- Download ActiveICM from here http://www.molsoft.com/getbrowser.cgi?product=activeicm&act=list (it is free!).
- Create an HTML page in ICM (File/New/Html).
- Add a series of slides.
- File/Export As ActiveICM Html..
To close a project:
File/Close Project
See the High Quality Publication Image chapter.
See the High Quality Publication Image chapter.
Preferences are described in the Preferences chapter.
Recently viewed projects and files can be easily downloaded from the "Recent Files" option. To access this:
- Select File/Recent Files.
- Select the desired project by clicking on it once.
Quickly retrieve and display PDB structures that have recently been viewed.
- Select File/Recent PDB Codes
- Select desired PDB code by clicking on it once and it will be loaded into the graphical display.
Need to close down ICM - no problem. You do one of the following:
- Select File/Quit. ICM will quit without saving files.
- Save and Click X at the upper right corner of the ICM window.
- Type
quitin the terminal window.
| NOTE: You may want to save the icm session as an ICM Project file before quiting. |
[ Delete | Delete All | Select All | Search in Workspace | Selection | Invert Selection | Clear Selection | Neighbor Selection | Undo | Redo | Restore | PDB Search | PDB Search by Field | PDB Search by Identity | PDB Search by Homology | PDB Search with External Sequence | Ligand Tools | Ligand Editor Preferences ]
This option will delete everything e.g. sequences, structures, tables ... Use with care!
This option will select everything e.g. sequences, structures, tables...
This option allow you to search for a particular text in the workspace
This option allows you to make a precise selection either by neighbors or specifying a particular atom or neighbor. Click on the tabs to jump between selection levels.
This option will select everything that is not currently selected.
This option will remove all selections. For more information on selections see the Making Selections Chapter.
This option will allow you to select neighboring atoms. For more information see the Select Neighbors section in the Selections Chapter.
Due to the complexities of working in an internal coordinates environment not everything can be undone or redone. Certain things like coloring and representations can be undone or redone.
Due to the complexities of working in an internal coordinates environment not everything can be undone or redone. Certain things like coloring and representations can be undone or redone.
ICM periodically makes a backup of your ICM project. If for whatever reason you lose an ICM session and you want to load the backup for the file use:
Edit/Restore Recent Backup
See PDB Search Tab
See PDB Search Tab
See PDB Search Tab
See PDB Search Tab
See PDB Search Tab
See the ligand editor section of the manual.
See the ligand editor section of the manual.
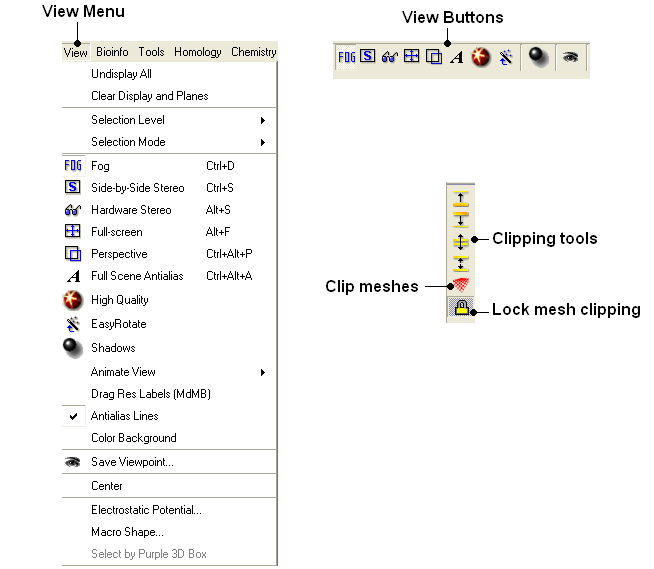
[ Undisplay All | Clear Display & Planes | Selection Level | Selection Mode | Fog | Side-by-Side Stereo | Hardware Stereo | Full Screen | Perspective | Full Scene Antialias | High Quality | Easy Rotate | Shadows | Sketch Accents | Animate View | Drag Res Labels | Antialias Lines | Color Background | Save Viewpoint | Center | Electrostatic Potential | Macro Shape | Select by Purple 3D Box ]
To undisplay everything currently displayed in the graphical display
- View/Undisplay All
| Note For more details on displaying structures please see the GUI Overview chapter. |
To clear the display and planes
- View/Clear Display and Planes
| NOTE: For more details on planes please see the sections on clipping tools and mesh clipping. |
There are four levels of selection - atom, residue, molecule and object. For more details on selections please see the Making Selections section.
There are four different ways to make selections - new, add, remove and toggle. For more details on selections please see the Making Selections section.
Fog Toggle(Ctrl + D) : this feature creates a fog-like environment for your object, so that the part of your structure that is closer appears clear and the distant parts are faded as if they are in fog. The clipping planes control the point at which the fog begins.
- View/Fog
Side-by-side stereo toggle(Ctrl + S) : this feature allows you to view your structure in 3D form without any 3D goggles.
- View/Side-by-Side Stereo
Hardware stereo toggle(Alt + S) - if you have 3D goggles and you wish to view your structure in 3D form, this feature will allow you to do so.
- View/Hardware Stereo
Full screen toggleAlt_F - this makes your graphical display fill the entire screen. If you wish to exit this mode, press escape.
- View/Full Screen
Toggle perspective Ctrl_P this will add perspective to your structure, enhancing depth in the graphical display.
- View/Perspective
Anti-aliasing is the technique of minimizing the distortion artifacts known as aliasing when representing a high-resolution signal at a lower resolution. Always use this option before making high resolution images.
- View/Full Scene Antialias
Toggle High Quality: this option will give your ICM object better resolution and higher quality. The change in quality is most visible at a high magnification. However, if your object is very large, this feature could slow down your program.
Always use this option before making high resolution images.
- View/High Quality
Toggle easy rotation: this feature is necessary if your structure is very large or perhaps your computer cannot quickly rotate it. It will prevent your structure from fully loading each time you rotate it, therefore speeding up the process.
- View/Easy Rotate
- View/Shadows
See Graphics Effects chapter.
- View/Sketch Accents
See Graphics Effects chapter.
This tool is described in more detail in the Molecular Animations and Transitions section.
To change the location of your residue label:
- Select View/Drag res labels.
- If your mouse has a middle mouse button, then click on handle (as shown) of the label you wish to move, and drag it to your desired area.
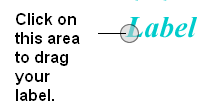
- If your mouse does not have a middle mouse button, then click on the Translation icon on the toolbar, and click on the handle (as shown) of the label you wish to move, and drag it to your desired area.
The +/- buttons on the side of the Residue and Atom buttons will shift the label. There are also other residue label move options available when you click and hold the residue label button. These options include Shift to Sidechain Tips, Shift to Calphas, and Restore Positions
Use this option to activate antialias lines. It is recommended to leave this option selected.
- View/Antialias Lines
To change the background color
- View/Color Background
- Select a color from the panel and press OK.
This option is also in the more convenient display tab.
It is possible to store a current view using the button shown below.
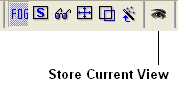
Click on the button and the current view will be stored so that you can view it later. A data entry box will be displayed asking you to name the view. All stored views can be found in the ICM workspace as shown below.
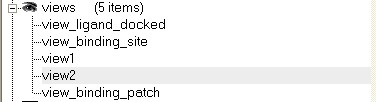
- Double click on the view in the ICM Workspace to display it.
A number of view display options are available by right clicking on the view in the ICM workspace as shown below.
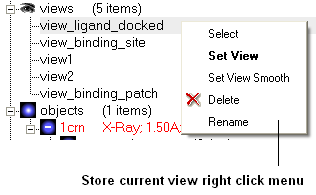
The option in the right click menu called "set view smooth" returns to the view slowly showing the trajectory between the original view and the current one.
To center on an object displayed in the graphical display
- Make a selection on the region on which you wish to center on.
- Tools/Center (or use the center button on the right hand-side of the graphical display).
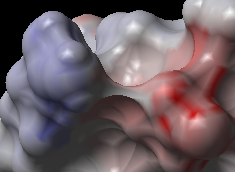
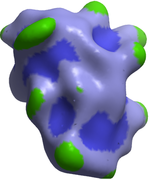
This option generates the skin representation of the molecular surface colored according to the electrostatic potential calculated by the REBEL method (hydrogen atoms are ignored). REBEL is a method to solve the Poisson equation for a molecule. REBEL is a powerful implementation of the boundary element method with analytical molecular surface as dielectric boundary. This method is fast (takes seconds for a protein) and accurate. REBEL stands for Rapid Exact-Boundary ELectrostatics. The energy calculated by this method consists of the Coulomb energy and the solvation energy
In order to color the skin of your molecule by electrostatic potential:
- Select View/Electrostatic potential.
- Enter the potential scale value. This is the local electrostatic potential in kcal/e.u.charge units at which the surface element is colored by extreme red or extreme blue. All higher values will have the same color. This absolute scaling is convenient to develop a feeling of electrostatic properties of molecular surfaces.
- Areas colored blue represent positive areas and red represents negative areas.
A macroshape allows easy viewing and manipulation of a structure. A macroshape representation is ideal for large structures which allows the user to easily identify important regions of the structure and facilitate the return to the 'standard' view of a particular molecule. The level of detail displayed in the macroshape can be controlled by changing the number of harmonics, gridStep, and, contour level.
- View/Macro Shape
An alternative way to make a make-selection{selection} is to use the purple 3D box. To do this:
- Select the display tab and the purple box button
- View/ Select by Purple 3D Box
- The atoms contained within the purple box will be selected.
The tools in this menu are described in the Bioinfo Menu chapter.
The options in the menu are described in the Crystallographic Analysis chapter.
The options in this menu are described in the 3D Predict chapter.
The options in this menu are described in the Protein Structure Analysis chapter.
The options in this menu are described in the Protein Superposition chapter.
[ Plot Function ]
To plot a function:
- Tools/Extras/Plot Function
- Enter the Function(x) e.g. Sin(x)
- Enter the starting value of x (From).
- Enter the end point of x (To).
- Enter the number of points (N points).
- Click OK and your plot will be displayed next to a table of values for your function.
[ Learn | Predict | Clustering | Sort Table | Table Merge | Columns | Append Rows ]
Learn and Predict tools are described here.
This is described in the cluster section of the Working with Tables Chapter.
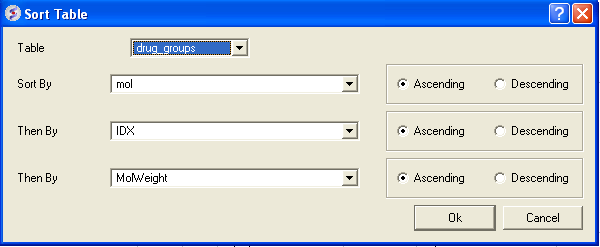
There are a couple of ways to sort a chemical table. You can right click on a column header and select sort or you can use the option in the menu Chemistry/Sort Table.
- Read a chemical table into ICM.
- Select the columns by which you wish to sort by as shown below.
- Select Ascending or Descending and for each sort by option and then click OK
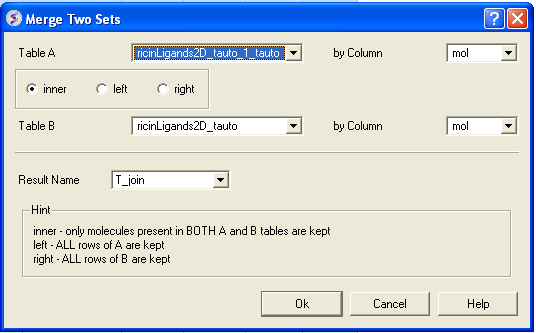
To merge two tables:
- Read the two tables into ICM.
- Tools/Table/Merge Two Sets
- Select the first table from the drop down list (Table A) and the column you wish to use to merge the table by.
- Select merge method 1. inner - only molecules present in BOTH A and B tables are kept; or 2. left ALL rows of A are kept ; or 3. right ALL rows of B are kept.
- Select the second table from the drop down list (Table B) and the column you wish to use to merge the table by.
- Enter a name for the output table.
- Click OK and a new table will be displayed.
To add external columns to a table (e.g. based on a merging key):
- Read at least two tables into ICM - the table you want to add to and the table you want to add the column from.
- Tools/Table/Add External Columns
- Enter the target table name and the column you wish to match each table by.
- Enter the source of the new column (Other table and column name)
- Choose to add "all the columns" from the source or "overwrite matching columns" or select the columns you want to add by selecting the "choose column" option.
- Select the columns you wish to add.
To append rows from one table to another one:
- Read at least two tables into ICM - the table you want to add to and the table you want to add the column from.
- Tools/Table/Append Rows
- Enter the name of the Target Table (where you will append).
- Enter the name of the Source Table (where you will append from).
- Select whether to Merge Columns
- Check whether you would like to Select New Rows. If you do this you can easily highlight the new rows using the mark row option.
- Check whether you would like to Calculate Columns with Formulas.
Chemical searching is described in the Chemistry chapter here.
The molecular editor is described in the Chemistry chapter here.
The options in this menu are described in the Homology Modeling Chapter.
The tools in the Chemistry menu are described here.
The tools in the Docking menu are described in the Docking chapter.
The options in this menu are described in the Molecular Mechanics chapter.
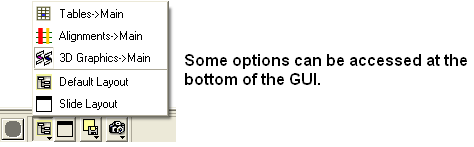
This menu allows you to choose the windows you wish to display. The windows which open automatically when you first open GUI are shown in the Getting Started section. Other windows can be displayed by selecting the windows menu. For example, if you have loaded a table but cannot see it in the GUI it may be because the Tables option in the window menu has not been selected.
To add or remove windows from the GUI display select the 'window menu'. Other windows not included in the default display such as tables and alignments can be added.
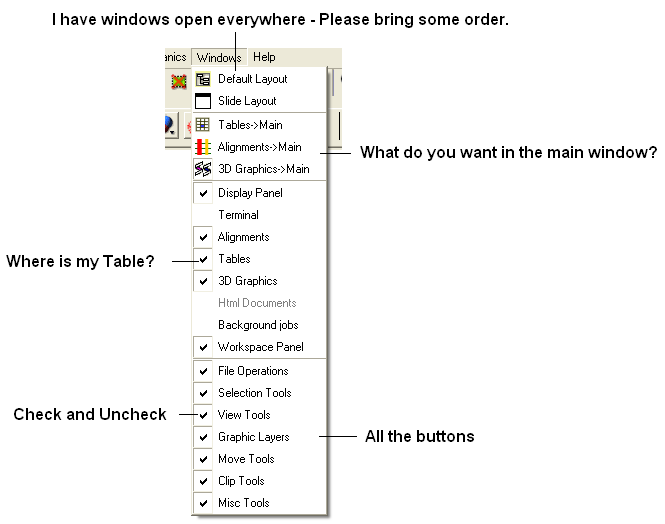
To return to the default display option select the 'Default layout' option in the windows menu.
OR
Click the default layout icon.